


BASIC OPERATIONS
Before operating this machine, make sure you
have read this manual attentively! Failure to read
and understand the instructions, warnings and safe-
ty guidelines provided in this manual may lead to
serious injury and / or damage to machine or the
workpiece.
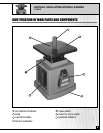
Be sure the sanding spindle is securely installed in
the machine.
Make sure the table tilt locking levers are secured
and that the table is locked in place at the desired
angle or tilt.
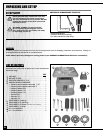
Make sure the machine is installed on a flat, sturdy
and stable surface able to support the weight of the
machine and the workpiece to be sanded.
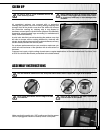
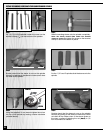
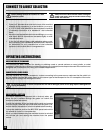
1. Select and install a spindle that is smaller than the curve to be sanded.
2. Use an appropriate table insert plate that comes closest to the spindle without touching it.
3. Make sure that spindle is properly installed in the spindle seat. With the supplied wrenches tighten the nut
slightly beyond hand-tight.
NOTE: Spindle threads are reversed. Turn Clockwise to loosen and counter clockwise to tighten.
NOTE: Never over tighten; it may be difficult to remove the spindle later.
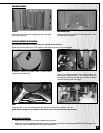
4. When table is set at a 90° angle, sanding may be done
from any corner, or location on the table.
5. When the table is positioned at any angle other than 90°,
sanding should only be performed with the workpiece
positioned below the centre point of the table (photo)
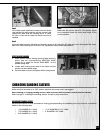
6. Make sure the table tilt locking levers are secured and that
the table is locked in place at the desired angle or tilt.
7. Always loosen both table tilt locking levers before changing the angle position of the table. Never force the
table. If it does not tilt easily it may be that the locking levers may still be engaged.
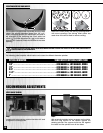
8. Hold the workpiece firmly and work from a stable standing position.
9. To achieve the best finish results and to ensure maximum sanding sleeve life, slowly move the workpiece back
and forth across the entire surface of the sanding spindle.
13
ok
ok
ok
ok
MAINTENANCE
Make sure the switch is in the OFF position and unplug the unit from the power source before performing any
maintenance.
• All bearings are sealed and permanently lubricated. No further lubrication is needed.
• Periodically inspect all hardware, fittings and fasteners that may have loosened due to vibration – re-tighten as
needed.
• To minimize airborne dust particles periodically inspect all dust collection fittings – re-tighten as needed.
• Inspect the ON/OFF SWITCH for damage before each use.
• Keep the machine CLEAN and FREE OF DUST to help dissipate heat.
• Check and if necessary replace all damaged TABLE INSERTS, SPINDLES or SANDING SLEEVES
• Periodically inspect the power cord and plug for damage. If necessary replace the power cord and the plug at
the first signs of visible damage.
• Use only recommended parts and accessories. The use of parts or accessories NOT recommended by General
International may result in a risk of injury or damage to the machine.