


English
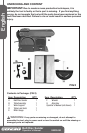
Belt/Disc Sander
Operator’s Manual GBDS450
WARNING: Always switch off the tool before unplugging it to avoid
accidental starting when re-plugging the tool into a power source.
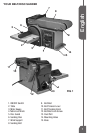
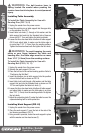
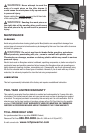
Dust Port
Yoursanderhasa2-1/4"dustport(13-FIG1)locatedontheleftsideofthesander.Theportcanbe
connectedtoadustcollectionsystem.
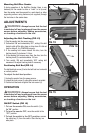
Bevel Sanding (FIG 16)
Thetablecanbetiltedfrom0to45forbevelsanding.
To set table at bevel position
1.Loosenthetablelockknobandtiltthetabletothedesired
angle.
2.Retightenthetablelockknob.
Sanding Small End Surfaces Using the
Miter Gauge (FIG 16)
Amitergaugeisincludedwiththetool.Usingmitergaugeis
recommendedforsandingasmallpieceonthesandingdisc.
1.Resttheworkpieceagainsttheedgeofthemitergauge.
2.Alwaysmovetheworkacrossthelefthandsideofthe
sandingdisc.
Surface Sanding on the Sanding Belt
(FIG 17)
Thesandingbeltcanbeusedeitherverticallyorhorizontally.
Dependingontheworkpiece,theworksupportcanbeused
eitherthehorizontalorverticalsandingoperation.Forsurface
sandingonthesandingbelt,usethehorizontalposition.
1. Hold the work piece rmly with both hands, keeping
ngersawayfromthesandingbelt.
2.Keeptheendbuttedagainsttheworkstopandmovethe
workevenlyacrossthesandingbelt.Useextracaution
whensandingaverythinpiece.
3.Applyonlyenoughpressuretoallowthesandingbeltto
removeasmallamountofmaterialatatime.
NOTE: Remove the work support when sanding
a long piece.
End Sanding on the Sanding Belt (FIG 18)
Forsandingtheendsoflongpiece,usethesandingbeltina
verticalposition.SeeFIG18
Usethetableinsteadofworksupport.
Usemitergaugeonthetableformoreaccuracy.
Sanding Curved Edges (FIG 19, 20)
Alwayssandtheinside curveonidlerdrumasshownin
FIG19
FIG 16
FIG 17
FIG 18
FIG 19