


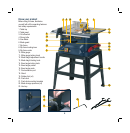


15
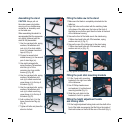
Making bevel cuts
1. Always use the fence when cutting bevels.
2. Set the saw blade to the required angle using the bevel
adjustment knob.
3. Set the fence to suit the width and height of the workpiece.
4. Carry out the cut in accordance with the workpiece width.
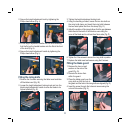
Making cross cuts
WARNING. When cross cutting, do not use the rip fence as
a length stop as the cut off piece could bind between the
fence and the blade and cause kickback.
1. Push the mitre gauge into one of the two slots of the
table saw and set it to the required angle. If you also
want to set the saw blade at an angle, use the slot, which
prevents your hand and the mitre gauge coming into
contact with the saw blade.
2. Press the workpiece firmly against the mitre gauge.
3. Switch on the saw.
4. Push the mitre gauge and the workpiece toward the saw
blade in order to make the cut.
IMPORTANT. Always hold the guided part of the workpiece.
Never hold that part of the workpiece, which is being cut
off. Always push the mitre gauge far enough forward for the
workpiece to be cut through completely.
5. Switch off the saw.
6. Wait for the saw blade to stop before removing the off-cuts.
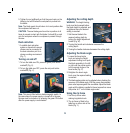
Changing the saw blade
WARNING. Switch off the table saw and remove the
mains power plug before carrying out any adjustments,
maintenance work or blade changes. Wear work gloves
when handling or fitting the blade.
1. Loosen the height adjustment locking knob and turn the
height adjustment handle until the saw blade is at its
maximum height.
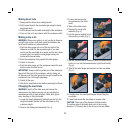
2. Remove the blade guard assembly (Fig. d).
3. Loosen and remove the
screws securing the table
insert.
4. Take out the table insert.
5. Remove the riving knife
assembly (Fig. e).
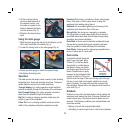
6. Use the spanner supplied to lock
the spindle in position (Fig. f).
e
f
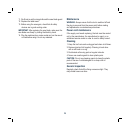
7. Use the second spanner supplied to undo the blade bolt by
turning it in an anti-clockwise direction (right-hand thread)
(Fig. g).
8. Take off the outer flange and remove it and the saw blade
(Fig. h).
g
h
9. Carefully clean the saw blade flanges before fitting the
new blade.
10. Insert and secure the saw blade in reverse order.
CAUTION. Take note of the direction of blade rotation.
The cutting edge of the teeth must point in the running
direction, i.e. forward (refer to the arrow on the saw blade).
d