


2
Contents
Warranty Power Tools
Whilst every effort is made to ensure your complete
satisfaction with this tool, occasionally, due to the mass
manufacturing techniques, a tool may not live up to our
required level of performance and you may need the
assistance of our service department.
This product is warranted for a 2-year period for home
domestic use from the date of the original purchase.
If found to be defective in materials or workmanship,
the tool or the offending faulty component will be repaired
or replaced free of charge with another of the same item.
A
small freight charge may apply. Proof of purchase is
essential. We reserve the right to reject any claim where
the purchase cannot be verified.
This warranty does not include damage or defects to the
tool caused by or resulting from abuse, accidents,
alterations or commercial or business use. It also does not
cover any bonus items or included accessories. Only the
powertool is covered under this warranty.
With continuing product development, changes may have
occurred which render the product received slightly
different to that shown in this instruction manual.
Please ensure that you store your receipt in a safe place.
Conditions apply to the above warranty. For full details of
the warranty terms and conditions please refer to our
website – www.gmcompany.com
For prompt service we suggest you log your service
request online - www.gmcservice.com.au, should you
not have access to the internet, please contact our
service department on 1300 880 001 (Australia)
or 0800 445 721 (New Zealand).
Warranty 2
Introduction 3
Environmental protection 3
Description of symbols 3
Specifications 3
General safety instructions 4
Additional safety rules for table saws 5
Unpacking 7
Before using the table saw 7
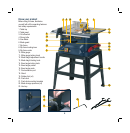
Know your product 8
Components 9
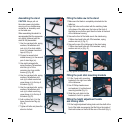
Assembling the stand 10
Fitting the table saw to the stand 10
Fitting the push stick mounting brackets 10
Fitting the height adjustment handle and locking knob 10
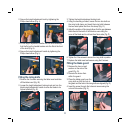
Fitting the riving knife 11
Fitting the blade guard 11
Dust extraction 12
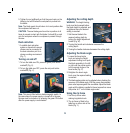
Turning on and off 12
Adjusting the cutting depth 12
Adjusting the blade angle 12
Using the rip fence 12
Using the mitre gauge 13
Operation 13
Push sticks 13
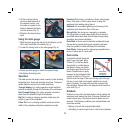
Kickback 13
Tips to avoid kickback 14
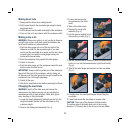
Making longitudinal cuts 14
Cutting a narrow workpiece 14
Cutting an extremely narrow workpiece 14
Making bevel cuts 15
Making cross cuts 15
Changing the saw blade 15
Maintenance 16
Power cord maintenance 16
Cleaning 16
General inspection 16