


Repair
311320G 23
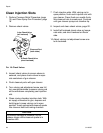
a. Remove ball and spring assembly. Hold
ball and unscrew assembly. If dirt or
material build-up prevents complete
removal of the spring, screw it back in.
Soak assembly in gun cleaner and try to
remove it again. If ball and spring
assembly cannot be removed undam-
aged, replace it.
b. Use check valve cleanout drill to clean
inside of closure screw. Insert the flat-
tened end of cleanout drill into opening
at end of screw, avoiding spurs in the
closure screw. Do not spin drill until the
flat on the drill has cleared spurs. Spin
drill with your fingers to loosen any
buildup, then remove drill and flush
inside of screw with gun cleaner. Next,
check area where ball seats for dam-
age. Also check sleeve for damage; it
should fit tightly on the end of the screw.
If there is damage or if the sleeve fits
loosely, replace it. Replace sleeve if
check valve can be threaded all the way
into gun block by hand. A good check
valve requires the use of a 5/16 in. nut
driver to make the last 1/4 turn, com-
pressing the sleeve. This compression
is required to create an internal seal in
the gun block.
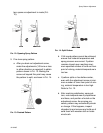
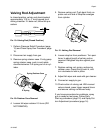
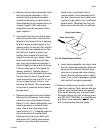
c. Remove damaged check valve sleeve.
Remove ball and spring. Insert check
valve into check valve sleeve removal
block (F
IG. 24). While holding block, and
keeping pressure on head of check
valve, slice check valve sleeve with
razor knife at a 10 - 15 degree angle rel-
ative to the plane of removal block.
Remove check valve from block and
peel sleeve off. If check valve sleeve
remains in gun block after removing
check valve, use extractor tool to
remove sleeve. Insert threaded end of
tool into cleanout port and, while press-
ing tool into gun block, turn it clockwise
several times. Withdraw tool from gun
block; sleeve should slide out with tool.
FIG. 24: Sleeve Removal Block
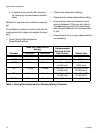
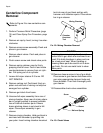
d. Insert spring assembly into check valve
and turn the screw clockwise. When the
spring is fully inserted, stem will jump
over spurs in screw and make clicking
sound. Ensure ball fully seats in check
valve. If not, or ball is damaged, replace
with new ball and spring assembly.
14.Remove retaining ring, washer, and felt
wiper from retainer. Flush retainer with gun
cleaner, insert new felt wiper and washer,
then install retaining ring. Loosely thread
felt wiper retainer into rear of mixing cham-
ber (DO NOT TIGHTEN). If not
installing to
gun block, store assembly in plastic vial
with corresponding cleanout spade.
Check Valve Sleeve
Insert Check Valve