


Model G0440/G0441 (Mfg. Since 03/12)
-39-
Removing / Replacing
Filter
The filter inside the canister assemblies can be
removed from the assembly so that it can be
replaced or rinsed off.
Removing/installing the filter requires removing
the canister filter assembly from the dust collec-
tor and disassembling it. Follow the instructions
below to perform this procedure.
When replacing the filter for the G0440 ask for
part number P0440032V2-4. For the G0441, ask
for part number P04410032V2-4 from Grizzly at
800-523-4777.
Tools Needed Qty
Open-End Wrench 10mm .................................. 1
Wrench or Socket 12mm ................................... 2
To replace the canister filter:
1. DISCONNECT MACHINE FROM POWER!
2. Remove the bag clamp and collection bag
from the canister assembly.
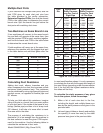
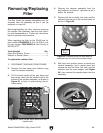
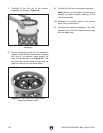
3. Pull the black handle all the way down and
secure the cable into the handle hook at the
bottom of the canister assembly, as shown in
Figure 62, to hold it in place during the fol-
lowing steps.
4. Remove the canister assembly from the
dust collector and place it right-side up on a
stable, flat surface.
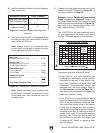
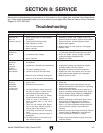
5. Remove the six hex bolts, hex nuts, and flat
washers from the rim of the canister base, as
shown in Figure 63.
Figure 62. Black handle cable secured in the
handle hook.
Black
Handle
Hook
Figure 63. Removing the hex nuts and flat
washers from the rim of the canister base.
Canister
Base
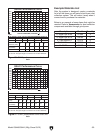
6. With help from another person to steady the
canister assembly, turn it upside down and
remove the two hex bolts, hex nuts, and flat
washers from the cross support (see Figure
64), then remove the canister base from the
assembly.
Figure 64. Cross support fasteners.
Remove These