


Model G0517 Mill/Drill
-17-
Installing/Removing
Drawbar Tooling
The Model G0517 includes an M12-1.75 drawbar.
Use the drawbar to connect the included drill
chuck arbor or an aftermarket end mill holder.
See Page 23 for recommended end mill holders.
Always DISCONNECT MACHINE FROM POWER
when installing or removing tooling.
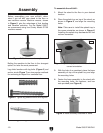
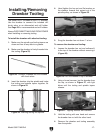
To install the drawbar with attached tooling:
1. Make sure the spindle and tooling tapers are
clean and free of any debris or grease.
2. Make sure the drawbar is firmly threaded into
the tooling (
Figure 23).
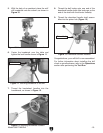
4. Hand tighten the hex nut and flat washer on
the drawbar threads that project out of the
spindle pulley, as shown in
Figure 25.
3. Insert the drawbar into the spindle and lodge
the tooling and spindle tapers together, as
shown in
Figure 24.
5. Snug the drawbar hex nut down
1
⁄2 a turn.
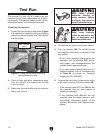
To remove the drawbar and tooling:
1. Loosen the drawbar hex nut and unthread it
to the top of the drawbar without removing it
(Figure 26).
Figure 23. Drawbar threaded into the included
drill chuck arbor.
Figure 24. Inserting tooling into spindle.
Figure 25. Tightening nut on drawbar.
2. Using a brass hammer, tap the drawbar from
the top, as shown in
Figure 27, with light
blows until the tooling and spindle tapers
release.
Figure 26. Nut unthreaded to top of drawbar.
Figure 27. Tapping drawbar with hammer.
3. Hold the tooling with one hand and remove
the drawbar hex nut with the other hand.
4. Remove the drawbar and tooling assembly
from the spindle.