


G0518 Drum / Flap Sander -15-
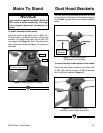
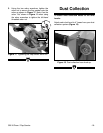
Figure 6. Attaching motor to stand.
Figure 8. Attaching dust hood
brackets to stand (back-side view).
Figure 7. Dust hood bracket
configuration (Front View).
Dust Hood BracketsMotor To Stand
To attach the motor to the stand:
Attach the motor to the stand with (4) M8-1.25 x
20 cap screws, (4) M8 flat washers, (4) M8 lock
washers, (4) plastic disc pads and (4) M8-1.25
hex flange nuts (Figure 6). Note–The plastic disc
pads should be installed between the motor and
the stand.
To attach the dust hood brackets to the stand:
Attach the dust hood brackets to the stand with
(4) M8-1.25 x 40 cap screws, (4) M8 flat washers
and (4) M8 lock washers (Figure 8).
The two dust hood brackets are identical, but they
do not attach to the stand in the same configura-
tion. Figure 7 shows the correct bracket configu-
ration.
Stand
Plastic Disc Pads
(One Under Each Corner)
Dust Hood
Brackets
Motor
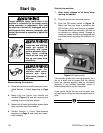
NOTICE
If you intend to operate the Model G0518 at
220V, rewire it before continuing. See Page
26 for complete instruction on rewiring the
sander.