


G0605X/G0606X Extreme Series 12" Table Saw
-35-
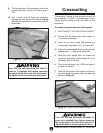
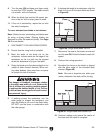
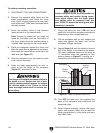
Figure 48. Single-blade dado first cut.
7. Reconnect the saw to the power source and
turn the saw ON. Allow the blade to reach full
speed.
8. Perform the cutting operation.
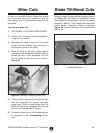
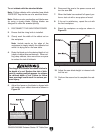
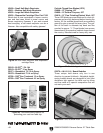
9. Re-adjust the fence so the blade is aligned
with the other edge of the intended dado
channel (
Figure 49).
Note: Be sure to keep the cuts within your
marks; otherwise, the dado will be too big.
10. Continue making cuts toward the center of
the dado until the dado is complete.
Figure 49. Single-blade dado second cut.
6. If dadoing the length of a workpiece, align the
blade to cut one of the dado sides as shown
in Figure 48.
The danger of kickback increases relative
to the depth and width of a cut. Reduce the
risk of kickback by making multiple passes
to achieve the desired depth of cut. Failure
to follow these warnings could result in seri
-
ous personal injury.
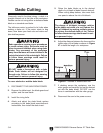
5. If dadoing across the workpiece, use the
miter gauge to support the workpiece, and
align the blade to cut one of the dado sides.
DO NOT use the fence in combination with
the miter gauge.
9. Turn the saw ON and keep one finger ready
to push the
STOP paddle. The blade should
run smooth, with no vibrations.
10. When the blade has reached full speed, per-
form a test cut with a scrap piece of wood.
11. If the cut is satisfactory, repeat the cut with
the actual workpiece.
To use a standard saw blade to cut dadoes:
Note: Reduce motor overloading and blade wear
by using a ripping blade. Ripping blades are
designed to clear the sawdust quickly. See Page
29 for more details.
1. DISCONNECT THE SAW FROM POWER!
2. Ensure that the riving knife is installed.
3. Mark the width of the dado cut on the
workpiece. Include marks on the edge of the
workpiece so the cut path can be aligned
when the workpiece is lying on the table.
4. Raise the blade up to the desired depth of cut
(depth of dado channel desired). When cut
-
ting deep dadoes,
take more than one pass
to reduce the risk of kickback.