-64- G1022 Series Contractor Saws
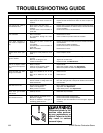
SYMPTOM
Motor will not start.
Motor will not start; fuses or
circuit breakers blow.
Motor overheats.
Motor stalls (resulting in
blown fuses or tripped cir-
cuit).
Machine slows when oper-
ating.
Loud, repetitious noise com-
ing from machine.
Blade is not square w/miter
slot or fence is not square to
blade.
Fence hits table top when
sliding on to the table.
Blade does not reach 90°.
Blade hits insert at 45°.
Blade won’t go beneath
table surface.
Hand wheels won’t turn.
POSSIBLE CAUSE
1. Low voltage.
2. Open circuit in motor or loose con-
nections.
1. Short circuit in line cord or plug.
2. Short circuit in motor or loose con-
nections.
3. Incorrect fuses or circuit breakers in
power line.
1. Motor overloaded.
2. Air circulation through the motor
restricted.
1. Short circuit in motor or loose con-
nections.
2. Low voltage.
3. Incorrect fuses or circuit breakers in
power line.
4. Motor overloaded.
Applying too much pressure to work-
piece.
1. Pulley setscrews or keys are missing
or loose.
2. Motor fan is hitting the cover.
3. V-belts are defective
1. Blade is warped.
2. Table top is not parallel to blade.
3. Fence is not parallel to blade.
1. Front rail is bolted too low on the
table.
2. Rear rail is bolted too low on the
table.
1. 90° stop bolt is out of adjustment.
2. Pointer bracket is hitting before the
blade reaches 90°.
1. Hole in insert is inadequate.
2. Table out of alignment.
3. Blade position is incorrect.
Table top too low.
1. Hand wheel key is inserted too far.
2. Bullets are wedged.
3. Roll pin or setscrew in worm gear is
contacting geared trunnion.
CORRECTIVE ACTION
1. Check power line for proper voltage.
2. Inspect all lead connections on motor for loose or open con-
nections.
1. Inspect cord or plug for damaged insulation and shorted wires.
2. Inspect all connections on motor for loose or shorted terminals
or worn insulation.
3. Install correct fuses or circuit breakers.
1. Reduce load on motor.
2. Clean out motor to provide normal air circulation.
1. Inspect connections on motor for loose or shorted terminals or
worn insulation.
2 Correct the low voltage conditions.
3. Install correct fuses or circuit breakers.
4. Reduce load on motor.
Feed workpiece slower.
1. Inspect keys and setscrews. Replace or tighten if necessary.
2. Tighten fan or shim cover.
3. Replace V-belts. See Maintenance.
1. Replace blade.
2. Make table parallel to blade. See Adjustments.
3. Make fence parallel to blade. See Adjustments.
1. Raise front rail.
2. Raise rear rail.
1. Adjust 90° stop bolt. See Adjustments.
2. File down the right side of the pointer bracket until the blade
can reach 90°.
1. File or mill the hole in the insert.
2. Align table. See Adjustments.
3. Adjust blade position. See Adjustments.
Raise table top w/washers.
1. Remove hand wheel and adjust key.
2. Remove hand wheel and adjust bullets.
3. Inspect roll pins and setscrews in the worm gear. Tighten if
necessary.
TROUBLESHOOTING GUIDE
Disconnect power to the
machine when perform-
ing any maintenance or
repairs. Failure to do this
may result in serious
personal injury.
!


