


-10- G1148 15" Bandsaw
SECTION 4: ASSEMBLY
Beginning Assembly
Most of your bandsaw has been assembled at the
factory. The remainder of the machine should be
fairly easy to assemble in your shop. The assem-
bly process is organized in steps. Please follow
these steps in sequence. We also recommend
that you review the diagrams and parts lists to
become familiar with all the parts before you
begin.
THE FOLLOWING TOOLS WILL BE NEEDED:
10mm and 12mm wrenches, a set of metric
Allen
®
wrenches, flathead screwdriver, Phillips
®
screwdriver, and a 6" or 8" adjustable wrench.
NOTE: Threads on the fasteners are USA stan-
dard coarse. The heads, however, are metric.
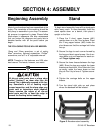
Stand
All die-cut metal parts have a sharp edge
(called “flashing”) on them after they are
formed.This is generally removed at the fac-
tory. Sometimes a bit of flashing might
escape inspection, and the sharp edge may
cause cuts or lacerations when handled.
Please examine the edges of all die-cut
metal parts and file or sand the edge to
remove the flashing before handling.
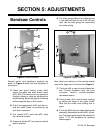
Figure 3. Bandsaw stand assembly.
To begin stand assembly, keep all the stand parts
within easy reach. To ease assembly, build the
stand upside down on a bench, then place it
upright on the floor.
1. Place the 2 short upper braces (#81)
upside down on a flat, hard surface. Place
the 2 long upper braces (#83) inside the
short braces so that the carriage bolt holes
line up.
2. Secure the legs to each corner formed by
the long and short upper braces. Use 4 car-
riage bolts, nuts, and washers for each cor-
ner. Finger tighten only.
3. Secure the lower braces between the legs
(#85). Since the legs are angled, the lower
braces are directional, if the holes don’t line
up easily, rotate the lower brace so that
they do. Don’t try to force it. Tighten secure-
ly.
4. Tighten the carriage bolts on the upper
braces.
5. Turn the stand right side up and place
where the bandsaw will be located.