


G1495 Heavy-Duty Wood Lathe
-13-
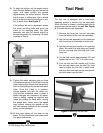
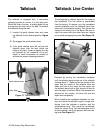
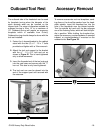
Tool Rest
Figure 9. Mounting the tool rest.
The tool rest is equipped with a cam-action
clamping system to secure it to the lathe bed.
When the lever is thrown, a locking plate lifts up
and secures the tool rest to the bed. See Figure
9. To install the tool rest assembly:
1. Remove the large hex nut and lock plate
from the bottom of the tool rest assembly.
2. Set the tool rest assembly on the lathe bed
with the clamp stud between the bed slot.
3. Set the tool rest lock handle so it is pointing
down. Re-install the lock plate and thread
the hex nut back onto the stud until it bot-
toms out.
4. Lift the lock handle approximately 90˚ and
tighten the hex nut
1
⁄2 to
2
⁄3 of a turn more.
5. Turn the tool rest lock handle until it locks
the tool rest down onto the bed. You may
need to adjust the Hex Nut in small incre-
ments to fine tune how the tool rest assem-
bly locks down onto the bed.
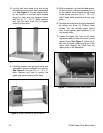
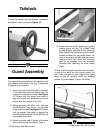
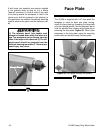
Figure 8. Using plumb bob for pulley alignment.
8. To align the pulleys, set the speed control
lever mid-way between high and low so the
upper and lower pulleys are spread
approximately the same amount. Ensure
that the lathe is sitting level. Use a plumb
bob to check the side of the pulleys in rela-
tion to each other. See Figure 8.
If the pulleys are not in alignment, loosen
the motor mounting bolts and move the
motor on its mounting plate. The lathe
assembly can also be moved slightly to
achieve alignment, by loosening the bolts
installed in Step 5.
9. Tighten the motor adjusting nuts so there
is constant pressure on the V-belt from the
lower motor pulley. Ensure that the motor is
level and the pulleys are parallel with each
other. Once the V-belt is in position,
change speeds only with the motor run-
ning and the headstock cover in place. If
speed changes are necessary for adjust-
ment or testing, unplug the machine and
rotate the pulleys by hand while moving
the speed lever. Never move the speed
lever without rotating the spindle as the
belt can become jammed or the movable
pulley can be damaged.
10. At this point tighten all the bolts on the
stand. Put the headstock cover plate back
into place and secure.