


G3105 Combination Sander -15-
SECTION 7: MAINTENANCE
General
Shielded and pre-lubricated ball bearings require
no lubrication.
As for other items on this machine, such as roller
shafts, use an occasional “shot” of light machine
oil. Wipe off any sawdust or grit with a clean cloth
before applying light oil.
The working table and other non-painted sur-
faces on the Model G3105 should be protected
against rust and pitting. Some woodworkers rec-
ommend using automotive paste wax on
exposed steel and cast iron surfaces. If you use
paste wax, make sure that it’s 100% Carnauba
wax.
Make a habit of inspecting your sander each time
you use it. Check for the following conditions and
repair or replace when necessary.
1. Loose mounting bolts.
2. Worn switch.
3. Worn or damaged cords and plugs.
4. Poor belt tensioning ⁄ tracking.
Lubrication
Sander Tables
Belts and Discs
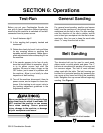
The Sanding Disc accepts 6" diameter cloth or
paper backed sanding discs. The belt sander
requires a 1" x 42" sanding belt. For disc or belt
sanding, we recommend a 100 grit (medium)
material for general purpose sanding, a 60 grit
(coarse) material for rough work, and a 150 grit
(fine) material for finish jobs.
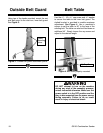
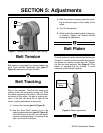
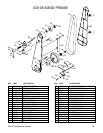
BELT REPLACEMENT
1. Remove the belt table and the belt guard.
2. Release tension on the belt.
3. Slip the belt off the top wheel and release
the Belt Tensioning Lever.
4. Remove the belt from the machine.
5. Slide the new belt over the lower wheel,
push back on the Belt Tensioning Lever,
and slip the belt over the top wheel.
Release the tension. Note: Make sure the
directional arrows point down toward the
table when installed.
6. Replace the belt guard and table.
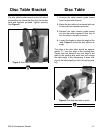
DISC REPLACEMENT
1. Remove Sanding Disc Table.
2. Carefully peel off old sanding disc paper.
Make sure disc is free of all adhesives and
foreign materials. Do not use petroleum-
based solvents to clean the aluminum disc.
This adversely affects adhesion.
3. Peel paper backing from new sanding
paper disc.
4. Center the sanding disc on the aluminum
disc. Hold in place for one minute using
firm pressure.
5. Replace Sanding Disc Table.