-14- Extreme Duty Planers
Most of your Extreme Duty Planer has been
assembled at the factory, but some parts must
be assembled or installed after delivery. We
have organized the assembly process into steps.
Please follow along in the order presented in this
section.
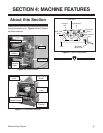
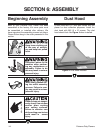
Dust Hood
Figure 4. Dust hood installed.
Keep loose clothing out
of the way of machin
-
ery and keep hair pulled
back.
Wear safety glasses dur-
ing the entire assembly
process. Failure to com
-
ply may result in serious
personal injury.
Disconnect power to the
machine when perform
-
ing any maintenance or
assembly. Failure to do
this may result in serious
personal injury.
A dust hood with a 5" dust port comes with the
planer for dust collection purposes. Install the
dust hood with M6-1.0 x 10 screws. The dust
hood should look like Figure 4 when installed.
Planer knives are danger-
ously sharp! Use extreme
caution when working
near cutting surfaces.
Failure to exercise care
while working near knives
could result in severe
injury.
Beginning Assembly
SECTION 6: ASSEMBLY


