


-30- Extreme Duty Planers
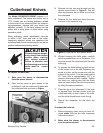
8. Working from the back of the planer is easi-
est because the anti-kickback pawls hang
down in the front. Place a piece of newspa
-
per on each wood block so it is both under
the cutterhead and accessible from the back
of the planer. The newspaper will act as a
feeler gauge to help you know when the
table is high enough. (Newspaper is about
.003" thick and is long enough for adequate
access.)
9. Raise the table close to the knife/insert edge.
Continue raising the table with the micro
adjust knob while constantly checking for
resistance on the newspaper. When you get
a medium drag on the paper, stop raising the
table and remove the newspaper.
This table position will now be your reference
point from which to make the other adjust
-
ments.
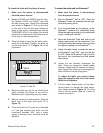
10. Lower the feed rollers so they rest on the
wood blocks. Back the adjustment bolts out
another
1
⁄8" (approximately).
11. Notice where the hairline indicator reads on
the table height scale. With the micro-adjust
-
ment knob, lower the table approximately
1mm on the scale (1mm = .039").
12. On the right and left sides, raise the adjust-
ment bolts up to the roller blocks and tighten
the check nuts. Make sure the adjustment
bolts do not move while tightening the check
nuts.
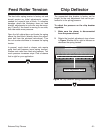
13. Rotate the pressure bar down to its original
position. On the pressure bar, back the stop
bolts out enough so that the pressure bar
rests on the wood blocks below.
14. Set the stop bolts so they barely touch the
planer body and tighten the check nuts to
keep them in place.
15. Replace the springs and nuts. Tighten the
nuts down on the tension stud so that the top
of the nut is approximately
1
⁄4" from the top of
the tension stud.
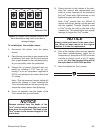
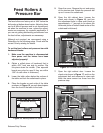
To set the feed rollers and pressure bar with
a Rotacator
®
:
1. Make sure the planer is disconnected
from power and the knives are adjusted
properly.
2. Read the previous instructions about setting
the feed rollers and pressure bar with wood
blocks—this will familiarize you with how to
access and adjust the feed rollers and pres
-
sure bar.
3. Engage the cutterhead lock.
4. Place the Rotacator
®
on the table, under-
neath the cutterhead. Line up the Rotacator
®
plunger on the edge of the knife. Set the dial
to .000" and lock in place.
5. Move the Rotacator
®
directly under the one
side of the feed roller and set the plunger on
a bottom dead center edge. Adjust the feed
roller until the Rotacator
®
reads .040".
6. Repeat step 4 on each end of each feed
roller. Double check for accuracy, then lock
the check nuts in place.
7. Adjust the pressure bar using the same pro-
cedure as with the feed rollers.