


Page 11For technical questions, please call 1-800-444-3353.SKU 44506
with enough extra length to allow free
movement while working.
Clamp workpiece or brace against 3.
column to prevent rotation.
There must not be objects, such as utility 4.
lines, nearby that will present a hazard
while working.
General Operating Instructions
Secure the tool to a supporting structure 1.
before use.
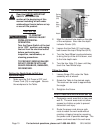
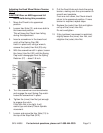
Make sure the Drill Press is OFF and the 2.
Power Cord (33) is unplugged. Loosen
the Lock Handle Support (C2) and adjust
the Table height to accommodate the
workpiece being drilled. Retighten Lock
Support Handle.
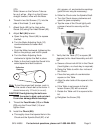
Open the Chuck (B8) and insert the drill 3.
bit in the center.
Tighten securely with the Chuck Key.
Secure the workpiece (and backup 4.
material) to the Table using a vise and/or
clamp.
The workpiece sits on the backup
material which in typically a scrap piece
of wood used to stabilize the workpiece.
It also helps the drill make a cleaner
hole. To keep it from spinning, have it
touching the left side of the Column.
Bring the drill bit down with the Feed 5.
Knob (12) to where the hole is to be
drilled.
Make minor workpiece alignment
adjustments.
Plug the Power Cord (33) into an 6.
electrical outlet.
Insert the Switch Key (24) into the 7.
Locking Switch (21).
Warning: Wear an ANSI-approved full face
shield while drilling.
Push the Switch up to turn the Motor ON.8.
Pull down on the Feed Knob and slowly 9.
drill the hole into the workpiece.
Warning: If the drill bit grabs and spins the
workpiece, do not attempt to stop the
spinning with your hands. Step back,
and push the Switch down to the OFF
position. Wait for the spindle to stop
turning before dislodging the workpiece.
When the drilling is complete, press the 10.
Switch to the OFF position and remove
the Switch Key (Keep the Switch Key in
a safe place).
To prevent accidents, turn off the tool 11.
and disconnect its power supply after
use.