


SKU 44506 For technical questions, please call 1-800-444-3353. Page 8
Setting the Depth Scale to Drill to a Specified Depth
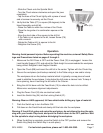
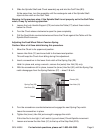
During this procedure, refer to the left photo on page 6.
1. Make sure the Drill Press is OFF and Power Cord (33) is unplugged. Secure the
workpiece to the Table.
2. Mark the desired hole depth on the side of the workpiece.
Also view the depth indicator Pointer (32) shown on page 9.
3. Loosen the Hex Nuts (31) and screw both toward the top of Stop Rod (B12).
4. Turn the Feed Wheel counterclockwise to bring the tip of the drill bit down, next to the
hole depth mark.
5. Turn the Hex Nuts (31) down until they touch the Feed Wheel stop.
7. Turn the Drill Press ON and turn the Feed Handle counterclockwise until it drills the
hole and stops at the set depth.
8. Turn the Drill Press OFF.
Tilting the Table
1. Loosen Screw (C6) under the Table assembly with a wrench.
2. Rotate the Table to the desired angle.
The scale can be used to approximate the angle.
3. Retighten the Screw.
Maintenance
Warning: Before performing any maintenance to this machine, remove the line cord
from the electrical outlet.
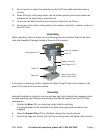
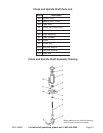
Removing the Chuck and Spindle Shaft
During this procedure, refer to the Chuck and Spindle Assembly Drawing.
1. Pull the Feed Wheel counterclockwise and hold the Chuck at a depth of three inches.
2. Align the key holes in the Spindle Shaft (B7) and the Quill Tube (B3) by turning the
Chuck by hand.
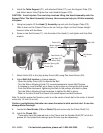
3. Insert a Wedge Drift Key (not supplied) into the key holes.
4. Lightly tap the Wedge Drift Key with a rubber mallet until the Spindle Shaft falls out of
the Quill Tube.
Place a bundled cloth or basket below the Chuck to catch it when it falls.
Installing the Chuck and Spindle Shaft
1. Using a clean cloth, wipe the tapered surfaces on the Spindle Shaft (B7).