


17. Take caution as some woods contain preservatives such as copper
chromium arsenate (CCA) which can be toxic. When using these
materials extra care should be taken to avoid inhalation and minimize skin
contact.
18. Maintenance. For your safety, maintenance should be performed regularly
by a qualified technician.
Note: Performance of this tool (if powered by line voltage) may vary depending on
variations in local line voltage. Extension cord usage may also affect tool perfor-
mance.
Warning: The warnings, cautions, and instructions discussed in this instruction
manual cannot cover all possible conditions and situations that may occur. It
must be understood by the operator that common sense and caution are fac-
tors which cannot be built into this product, but must be supplied by the opera-
tor.
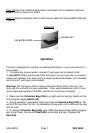
Unpacking
When unpacking, check to make sure the parts listed on page 6 are included. If
any parts are missing or broken, please call Harbor Freight Tools at the number
on the cover of this manual.
SKU 45378 Page 4
WARNING: This product contains or, when used, produces a chemical
known to the State of California to cause cancer and birth defects or other
reproductive harm. (California Health & Safety Code 25249.5,
et seq.
)
REV 07/02 REV 05/03
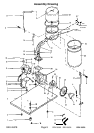
Your Dust Collector will require complete assembly prior to use. It is important that
you read the entire manual to become familiar with the product BEFORE you use
the Dust Collector. Before assembling the Dust Collector be sure that you have all
parts described in the Parts List and Assemby Diagram.
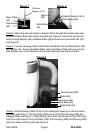
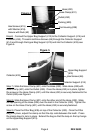
Step 1) Place Caster (#1) in place on the underside corner of the Base Plate (#3).
For all four (4) corners of the Caster (#1) insert one Hex Screw (#23) through
Washer (#16) down into Base Plate (#3) and through Caster (#1). Thread on Nut
(#19). Repeat for the remaining three (3) Casters (#1).
Step 2) Attach the first Collector Support (#14) to the Base Plate (#3). Line up the
Collector Support (#14) with holes on edge of the Base Plate (#3). Insert Hex
Screw (#6) down through Washer (#4), Base Plate (#3) and secure in place with Nut
(#2)-seeFigure 1 on the following page.
Assembly