


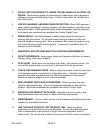
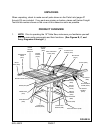

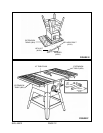
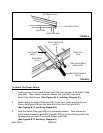

END BRACE (#6B)
MOUNTING HOLES
END BRACE (#6B)
HEX
NUT
(#2B)
WASHER
(#3B)
BASE
(#1G)
HEX HEAD
BOLT (#8B)
BASE
(#1G)
FIGURE D
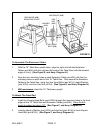
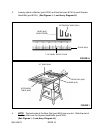
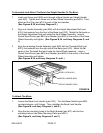
To Assemble The Extension Tables:
1. With the 10" Table Saw upside down, align the right and left side Extension
Tables (part #5H) with the right and left ends of the Table Saw (with the beveled
edges in front). (See Figure E, and Assy. Diagram H.)
2. Align the four mounting holes in each Extension Table (part #5H) with the four
mounting holes on each end of the 10" Table Saw. Then secure the Extension
Tables to the Table Saw, using four Hex Head Bolts (part #11H), eight Washers
(part #12H), and four Hex Nuts (#13H). (See Figure E, and Assy. Diagram H.)
3. With assistance, stand the 10" Table saw upright.
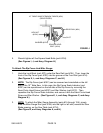
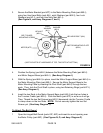
To Attach The Front Rail:
1. Insert five Square Head Bolts (part #10H) through the mounting holes in the front
edges of the 10" Table Saw and Extension Tables (part #5H). Allow the bolt
heads to extend out about 1/2". (See Figure F, and Assy. Diagram H.)
2. Loosely attach a Washer (part #12H) and Hex Nut (part #13H) to each Square
Head Bolt (part #10H). (See Figure F, and Assy. Diagram H.)
SKU 46813 PAGE 11