


Page 15For technical questions, please call 1-800-444-3353.SKU 66755
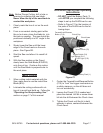
Set the Cutting Depth
The cutting depth of the Saw Blade (A3)
can be adjusted up to a 1-1/2” depth
when the cutting angle is set to 90°, or
up to 1-1/16” when the cutting angle is
set to 45°.
The cut should be deep enough to cut
all the way through the material but not
deep enough to bite into a surface be-
neath. Adding about 1/8” cut greater
than the thickness of the material is
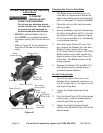
advised. To adjust the cutting depth of
the Saw:
Loosen the Depth Adjustment Knob 1.
(A46).
Pivot the Base Plate (A36) to the desired 2.
cutting depth, using the measurements
on the Depth Guide as a guide.
Tighten the Depth Adjustment Knob 3.
(A46) to hold the Base Plate (A36) at the
desired cutting depth.
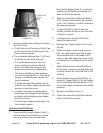
Using the Rip Fence
The Rip Fence can be used to make a
long uniform cut of a piece of material
to the same width, or to make repeated
cuts of the same width. To position the
Rip Fence for use:
Loosen the Rip Fence Knob (A42).1.
Position the Rip Fence (A35) (not shown 2.
in Figure A1) so that the top of the “T”
shape is facing down.
Slide the arm of the Rip Fence through 3.
the mounting slots (not shown) at the
front of the Base Plate (A36).
Adjust the Rip Fence to the desired cut-4.
ting width.
Tighten the Rip Fence Knob (A42).5.
To prevent accidents, turn off the tool 6.
and disconnect its power supply after
use. Clean, then store the tool indoors
out of children’s reach.
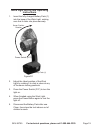
Operating the Circular Saw
Mark the line to be cut on the workpiece.1.
Adjust the depth and angle of the cut as 2.
needed.
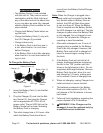
Slide a fully charged Battery Pack (1) 3.
into the end of the handle of the Circular
Saw, making sure that it clicks into place
securely. Be sure the Battery Pack (1) is
securely seated into the Saw Handle so
it will not fall off during use.
Position the Blade near the workpiece, 4.
depress the Safety Button (A15) and
hold the Trigger (A19-1)down. Release
the Safety Button once the tool has
power. Allow the Saw to come up to
full speed before addressing it to the
workpiece.
Hold the Circular Saw with both hands 5.
and allow it to cut through the workpiece
at it’s own pace.
When the cut is complete, release the 6.
Trigger. Allow the Saw to coast to a stop
before setting it down.
Remove the Battery Pack (1). 7.
Clean then store the Circular Saw in-8.
doors and out of children’s reach.