


Page 16 For technical questions, please call 1-800-444-3353. SKU 66755
Reciprocating Saw Set Up and
Operating Instructions
DO NOT• install the Battery Pack (1)
until AFTER you complete the following
steps to set up the Reciprocating Saw
for use.
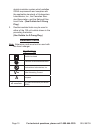
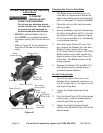
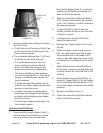
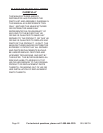
Refer to Figure B1 for the location of •
the parts of the saw for the following
steps.
Outer Ring & Clutch
Trigger (B19-1)
Guard
Safety Button (B18)
Figure B1
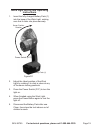
Installing the Saw Blade
Choose the correct Saw Blade (B15/1.
B16) for the material being cut. Fine
tooth Saw Blades (B16) are generally
used for cutting metal. Saw Blades (B15)
with larger teeth are generally used for
cutting wood.
To avoid accidental injury, make sure 2.
to wear heavy duty work gloves when
installing the Saw Blade.
Open the Outer Ring of the Clutch by 3.
turning it counterclockwise. Insert the
shank of the Saw Blade (B15/B16) fully
into the Chuck, making sure the teeth
of the Saw Blade face downward, away
from the tool. Then release the Outer
Ring and make sure it locks the Saw
Blade in place.
Operating the Reciprocating Saw
WiththeSawBladeinstalled,squeeze,4.
then release the Trigger (B19-1) to make
sure it is locked. It should not move.
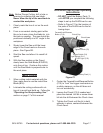
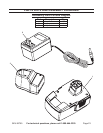
Slide a fully charged Battery Pack (1) 5.
into the bottom of the Handle of the
Reciprocating Saw, making sure that it
clicks into place securely. Be sure the
Battery Pack (1) is securely seated into
the Saw Handle so it will not fall off dur-
ing use.
Firmly hold the Reciprocating Saw with 6.
both hands. Position the Blade near
the work piece, depress the Safety
Button (B18) and hold the Trigger down.
Release the Safety Button once the tool
has power. Allow the Saw to come up
to full speed before addressing it to the
work piece.
IMPORTANT: Do not start the Saw if the
Saw Blade (B15/B16) is in contact with
anything before operation. If necessary,
lift the tool from the work piece before
squeezingtheTrigger.
NEVER cut into areas where you cannot 7.
identifyanypossiblehazardsbehindor
inside the surface being cut.
In preparation to making a cut, place the 8.
Guard on the surface to be cut. Align the
Saw Blade with the direction of the cut
and slowly lower the saw blade onto the
cut line to begin the cut. Do not attempt
to cut with the tip of the blade; kickback
and damage to the blade could result.
Note: When cutting hard woods, a hole
shouldbedrilledrsttoinsertthesaw
blade (see Plunge Cutting on next page).
Whennishedcutting,releasetheTrig-9.
ger to stop the tool.
Remove the Battery Pack (1). 10.
Clean, then store the Saw indoors and 11.
out of children’s reach.