


Page 17For technical questions, please call 1-800-444-3353.SKU 66755
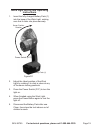
Plunge Cutting
Note: Before Plunge Cutting, drill a hole or
opening for inserting the saw blade.
Never allow the tip of the saw blade to
contact the workpiece.
Clearly mark the line of cut on the work 1.
piece.
From a convenient starting point within 2.
the cut out area, place the blade tip into
the hole or opening. The saw should be
positioned vertically at a 90° angle to the
workpiece.
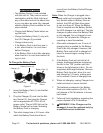
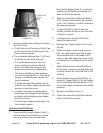
Slowly lower the Saw until the lower 3.
edge of the Guard rests on the work
piece - See Figure B2.
Start the Saw and allow it to reach full 4.
speed.
With the Saw resting on the Guard, 5.
slowly lower the Saw Blade (B15/B16)
onto the cut line. Continue this motion
until the Saw Blade is perpendicular to
the work piece.
Metal Cutting
When cutting metal materials with the 1.
Saw, make sure to use the metal Saw
Blade (B16).
Lubricate the cutting surface with cut-2.
ting oil to avoid heat build-up. Follow the
“Operating the Reciprocating Saw”
section on page 17 of this manual.
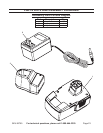
Drill/Driver Set Up and Operating
Instructions
DO NOT• install the Battery Pack (1)
until AFTER you complete the following
steps to set up the Drill/Driver for use.
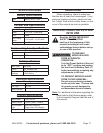
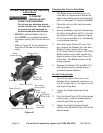
Refer to Figure C1 for the location of •
the parts of the Drill/Driver for the fol-
lowing steps.
Tighten Chuck (C2)
Chuck Jaws
Clutch Cap
Battery Pack (1)
Forward/Lock/Reverse
Button (C10)
Trigger Switch (C4)
Figure C1
LED Light (C12)
Light Switch (C11)
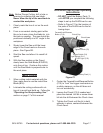
1. Center the Forward/Lock/Reverse Button
(C10) to “lock” the trigger mechanism as
a safety measure, so the drill does not
turn on accidentally.
Loosen the Chuck (C2) if needed and 2.
place the desired drill bit or screw driver
bit into the drill between the Chuck Jaws.
Tighten the Chuck until the bit is held 3.
securely in place, centered between the
Chuck Jaws.