


SKU 93351 For technical questions, please call 1-800-444-3353. Page 12
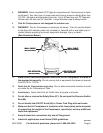
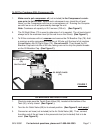
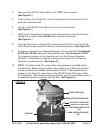
4. Make sure the ON/OFF Switch (86) is in its “OFF” (down) position.
(See Figure G.)
5. Plug the Power Cord Plug (64) of the Air Compressor into the nearest 120 volt,
grounded, electrical outlet.
6. Pull up on the ON/OFF Knob (86) to turn on the Air Compressor.
(See Figure G.)
7. While the Air Compressor is running, allow sufficient time for the Tank Pressure
Gauge (65) to reach at least 85 PSI before using the Compressor.
(See Figure G.)
8. Once the Tank Pressure Gauge (65) reaches at least 85 PSI, turn the Air Outlet
Valve (69) to its open position to allow air to the pneumatic tool. (See Figure G.)
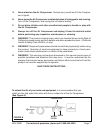
9. If necessary, adjust the tool Pressure Regulator (70) to provide the PSI (between
85 PSI and 110 PSI) required for the pneumatic tool. Do not exceed 110 PSI.
To increase air pressure to the pneumatic tool, turn the Pressure Regulator
clockwise. To decrease air pressure to the pneumatic tool, turn the Pressure
Regulator counterclockwise. (See Figure G.)
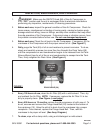
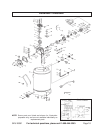
10. NOTE: The Safety Valve (67) is used when decompression is needed quickly
and efficiently. Before using the safety valve, always put on ANSI approved eye
and ear protection; the sudden decompression is loud. To decompress the air
pressure in the Tank (50), press down on the ON/OFF Knob (86) to turn off the
Air Compressor. While wearing hearing protection, pull out on the Safety Valve to
immediately release air pressure from the Tank. (See Figure G.)
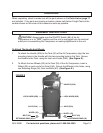
SAFETY VALVE (67)
PRESSURE SWITCH BOX (66)
TANK (50)
AIR OUTLET VALVE (69)
(CONNECT AIR HOSE HERE)
PRESSURE REGULATOR
(70)
TANK PRESSURE GAUGE
(65)
FIGURE G
ON/OFF KNOB (86)