


Page 10SKU 97503 For technical questions, please call 1-800-444-3353.
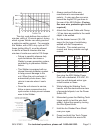
of the wheel, reference markings
0.6 or 0.8 are stamped. They
corresponding with wire sizes: 0.6 =
0.023”, and 0.8 = 0.030” and 0.035”.
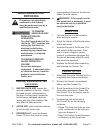
The groove facing to the inside of the
Wire Feed Mechanism (10) should
correspond with the size of wire used.
Align the axle key with the slot in the
Wire Feed Wheel and slide on the
Wire Feed Spool (BB). Replace Wire
Feed Wheel Cover (AA), the two
screws and tighten. See photo on
this page.
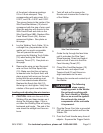
Lay the Welding Torch Cable (16) in 5.
a straight line, perpendicular to the
welder unit, as much as possible.
This will prevent the wire from
puncturing the Welding Torch Cable
(16) when exiting the Wire Feed
Housing Throat (FF). See photo on
this page.
Remove the wing nut and the spool 6.
axle nut from the Wire Spool Axle
(10). Make sure that the coil spring
is inserted onto the Spool Axle, and
place a spool with wire over the axle,
noting that the wire winding must
be in a counterclockwise direction.
Replace the Spool Axle Nut (10),
the wing nut, and tighten. Verify free
rotation of the spool over the axle.
Loading and adjusting the wire tension.
CAUTION:7. Hold onto the end of the
Welding Wire and keep tension on it
during the following steps. If this is
not done the Welding Wire will spring
backward and tangle. The end of the
wire should be straight and have no
burrs.
Twist off and pull to remove the 8.
Nozzle and unscrew the Contact tip
of the Welder.
9.
Guide the tip through the feed tube
until it protrudes the Wire Feed
Wheel opening. Direct and feed at
least an inch of wire into the Wire
Feed Housing Throat (FF).
Close Wire Feed Mechanism (10) 10.
over the wire, and adjust Feed
Tension Knob (D) until there is a
slight resistance on the wire.
Remove the nozzle and contact tip of 11.
the Welder.
The following
steps require
applying power to the Welder.
Do not touch anything with
the Torch Handle or Welding
Wire or an arc will be ignited.
Do not touch the internal
components of the unit while
it is powered.
Plug the Power Cord into a grounded 12.
230 volt electrical outlet and turn the
Welder ON.
Point the Torch Handle away from all 13.
objects. Squeeze the Trigger Switch
DANGER
(EE)
(FF)
(AA)
(BB)
(CC)
(DD)