


Page 6
SKU 97526
For technical questions, please call 1-800-444-3353.
Rev 10f
OPERATION INSTRUCTIONS
1. Before use, add a few drops of
pneumatic tool oil (not included) into
the Inlet.
2. Attach the Air Coupler (61) to Air
Inlet using pipe thread seal tape (not
included). Then connect the 3/8” Air
Source Hose to the Nailer.
3. Set the working air pressure on the
regulator to between 60 and 100 PSI.
Do not exceed 100 Max. PSI.
4. Set the Adjusting Dial (46) to match
the corresponding size (1/2”, 5/8”,
3/4”, 7/8” or 1”) of the fasteners
loaded in the Nailer.
Note: When changing pin size, turn the
Adjusting Dial to the new depth size
BEFORE inserting the new pins.
5. Slide the Safety (60) to the side so
that the Trigger (27) will function.
When ready, press down on the
Trigger (27) to operate.
6. Test before rst use by driving nails
into a sample piece of wood. If the
fasteners do not achieve the desired
penetration, adjust the air pressure
to a higher setting until desired
penetration is achieved.
7. Always make sure the Bracket (40)
is ush against the workpiece during
use. Always release the Trigger (27)
once the fastener is driven into the
workpiece.
8. When ready to operate the Nailer,
press down on the Trigger (27). Make
sure the Nailer does not cycle during
use. Never use the Nailer if a cycle
occurs.
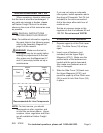
9. In case of a fastener jam, take your
nger off the Trigger (27). Rotate the
Trigger Lock/Safety (60) clockwise
or counter-clockwise. For instance,
a “6 o-clock” position will lock the
Trigger (27) and the tool will not re.
However, “3 o-clock” and “9 o-clock”
positions unlock the Trigger (27),
allowing the tool to re.
Note: There is no contact safety for the
Trigger (27). When the Trigger Lock/
Safety (60) is disengaged, the Nailer
will re.
10. Turn off the air supply and
disconnect the Nailer from the
regulator. Open the Nozzle (40) and
clear the jammed fasteners with a
pair of pliers (not included).
If a jam occurs inside the magazine,
depress the upper tip of the Click
Lever (59). The Side Cover (34)
will pop open. If needed, open the
Nozzle (40) to help clear the jam.
Once the jam is cleared, push the
Side Cover (34) back into place and
latch tight using the Click Lever (59).