


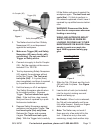
SKU 98751 For technical questions, please call 1-800-444-3353. Page 12
of nails into the Magazine behind the
few remaining nails and the Nailer will
be ready for further use.
Operating Nailer
Set proper angle of the Nailer for your
application (a three step process):
Failure to properly adjust the nailer
can result in tool failure or damage.
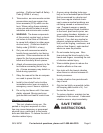
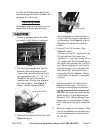
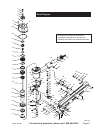
1.
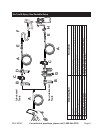
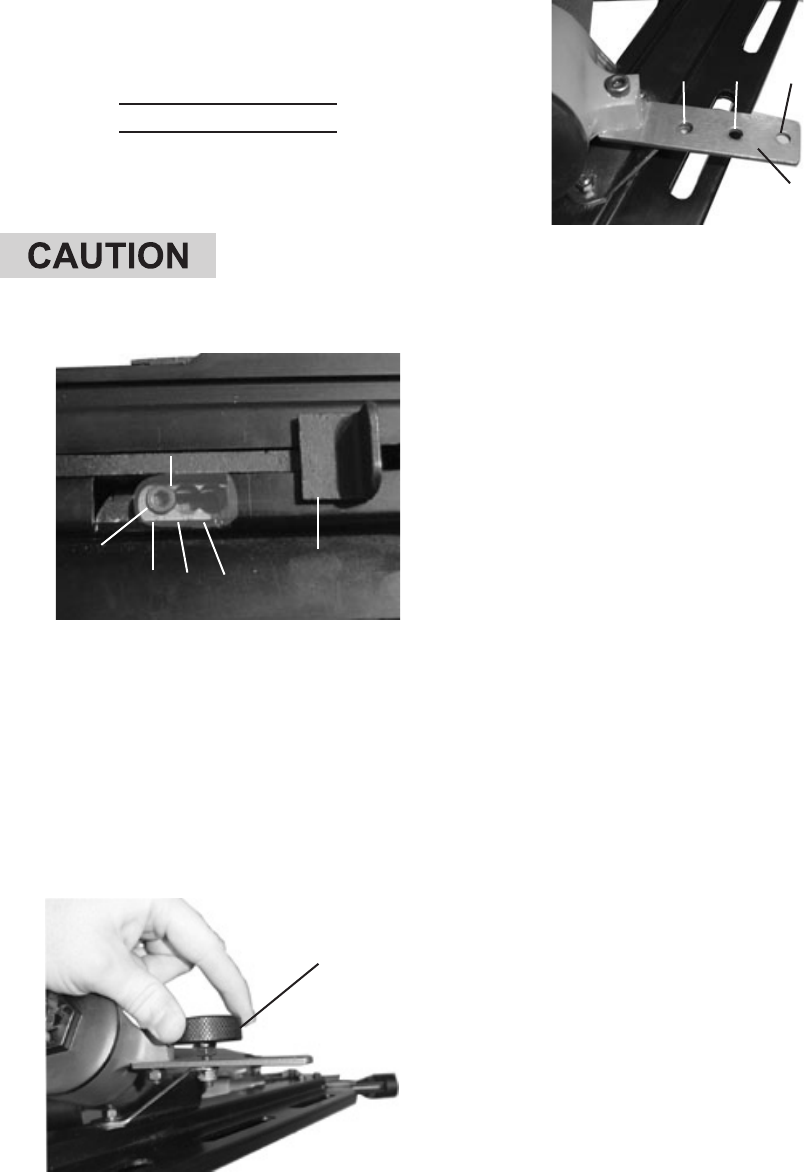
Angle Adjustment Holes
Tab (75)
21
o
28
o
34
o
Hex
Bolt
Figure 3
Pull back and engage the Tab (75),
exposing three adjustment holes.
Loosen the hex bolt and slide it into
the appropriate hole (21°, 28°, 34°).
Retighten the hex bolt securely,
making sure it ts into the appropri-
ate hole properly. See Figure 3,
above. Gently release the Tab.
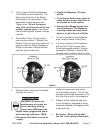
2.
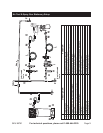
Adjuster Knob (85)
Figure 4
Remove the Adjuster Knob (85). See
Figure 4, above.
Figure 5
34
o
28
o
21
o
Joint Plate (86)
Move Magazine so desired hole on
Joint Plate (86) lines up with the nut
on Magazine. See Figure 5, above.
Replace and tighten the Adjuster
Knob.
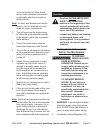
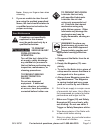
3. Inspect Pin’s (34) location. See
Figure 6, below.
If you are driving 21° angle nails, the
Pin should be in the lower hole
(position A). If you are driving 28° or
34° angle nails, the Pin should be in
the upper hole (position B). If the Pin
is in the wrong position, pull the Pin
from its Washer (35), reposition the
Bar Guide (36), and reinsert and
secure the Pin and Washer. Before
using Nailer, be sure Pin is properly
secured.
1. The driving depth of a nail can be
adjusted in two ways. First, by in-
creasing or decreasing air pressure
(never to exceed the maximum of
120 PSI). Secondly, by loosening the
Depth Screw (41) and adjusting the
Bracket A (40). We recommend you
experiment in a scrap piece of mate-
rial to determine how far to adjust the
unit.
2. Attach air supply to Air Coupler. Start
your air compressor and make sure it
is set to between the recommended
70-120 PSI.
Figure 6
Position A
(Pin in 21° Slot)
Position B
(Pin in 28° / 34° Slot)
Pin (34)
21
o
21
o
28
o
/ 34°
28
o
/ 34°
Pin (34)