


Page 11SKU 93981 For technical questions, please call 1-800-444-3353
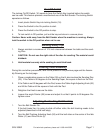
On / Off Switch
The locking On/Off Switch (16) needs to have the Switch Key inserted before the switch
can be used. This feature prevents unauthorized use of the Belt Sander. The locking Switch
operates as follows.
Insert plastic Switch Key into locking Switch (16).
Press the Switch to the On position to start.
Press the Switch to the Off position to stop.
To lock switch in Off position, pull out the key and store in a secure place.
Caution: Never walk away from the Belt Sander when the machine is running. Always
lock the switch in the Off position when not in use.
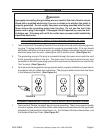
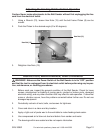
Sanding Safety Tips
Always maintain a maximum of 1/16 inch clearance between the table and the sand-
ing Disc.
CAUTION: Do not use the right side of the disc for sanding. The material could
kickback.
Hold material securely while sanding to avoid kick back.
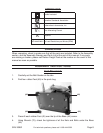
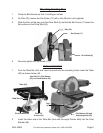
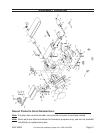
Leveling Table Assembly
During this and other procedures, refer to the photos on the previous page and the Assem-
bly Drawing on the last page.
Place a combination square on the Table (59) so that it also touches the Sanding Disc
(23). If the Table is 90 degrees to the Sanding Paper, the square is flush on the Pad.
If the Table is not 90 degrees with the Pad, loosen the Table Angle Adjusting Knob (55)
and tilt the Table until the square is flush with the Pad.
Retighten the Knob to secure the table.
Loosen the angle Pointer (58) screw and adjust it so that it points to 90 degrees. Re-
tighten screw.
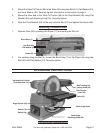
Adjusting the Sanding Belt Tracking
Turn the Belt Sander On.
If the belt looks like it is going to slide off either roller, the belt tracking needs to be
adjusted (described in the next step).
Turn the Belt Tracking Adjusting Knob (35) until the belt rides on the center of the Idle
Roller (41) and Drive Drum (5).
1.
2.
3.
4.
1.
2.
3.
1.
2.
3.
4.
1.
2.