


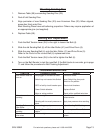
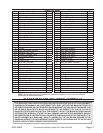

Page 12SKU 93981 For technical questions, please call 1-800-444-3353
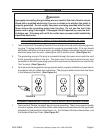
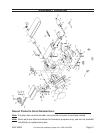
Adjusting the Sanding Belt for Vertical Operation
Caution: Never make adjustments to the Belt Sander without first unplugging the line
cord from the electrical outlet.
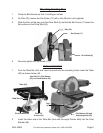
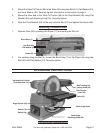
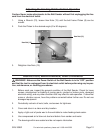
Using a Wrench (70), loosen Hex Nuts (13) until the belt frame Platen (8) can be
moved.
Push the Platen to the desired angle (0 to 90 degrees).
Hex Nut (13)
Hex Nut (13)
Retighten Hex Nuts (13).
1.
2.
3.
INSPECTION, MAINTENANCE, AND CLEANING
WARNING! Make sure the Power Switch of the Belt Sander is in its “OFF” position
and that the tool is unplugged from its electrical outlet before performing any inspec-
tion, maintenance, or cleaning procedures.
Before each use, inspect the general condition of the Belt Sander. Check for loose
screws, misalignment or binding of moving parts, cracked or broken parts, damaged
electrical wiring, and any other condition that may affect its safe operation. If abnormal
noise or vibration occurs, have the problem corrected before further use. Do not use
damaged equipment.
Periodically recheck all nuts, bolts, and screws for tightness.
Cover and store in a clean and dry location.
Apply a light coat of paste wax to the worktable to make feeding stock easier.
Use compressed air to blow out dust and debris from sander and motor.
The bearings within are sealed and do not require lubrication.
1.
2.
3.
4.
5.
6.