


Page 13SKU 93981 For technical questions, please call 1-800-444-3353
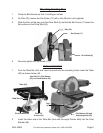
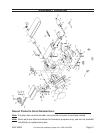
Mounting Sanding Disc
Remove Table (59) surrounding Sanding Disc (23).
Peel off old Sanding Disc.
Align perimeter of new Sanding Disc (23) over Aluminum Disc (22). When aligned,
press disc firmly onto Disc.
Most Sanding Discs have self-adhering properties. Others may require application of
an appropriate glue (not supplied).
Replace Table (59).
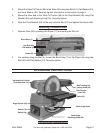
Sanding Belt Replacement
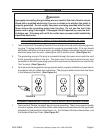
Push the Belt Tension Lever (34) to the right to loosen the Belt (4).
Slide the old Sanding Belt (4) off the Idler Roller (41) and Drive Drum (5).
Slide the new Sanding Belt (4) onto the Idler Roller (41) and Drive Drum (5).
Refer to the Parts List for correct Belt (4) replacement size.
Push the Belt Tension Lever (34) to the left to tighten the Belt (4).
Turn on the Belt Sander to test the new Belt. If the Belt tracks to one side, go to page
11 and follow the procedure for Belt Tracking Adjustment.
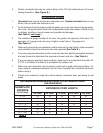
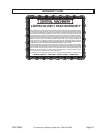
TROUBLESHOOTING
SYMPTOM PROBABLE CAUSE REMEDY
Belt Sander does not
turn on
Not plugged in to electrical outlet
Switch key not inserted into Switch
GFCI or facility circuit breaker open
Power Switch defective
Motor or wiring problem
Connect to outlet
Insert Switch Key, then push
Switch to On position
Reset circuit breakers
Replace Switch
Repair with a qualified technician
Motor slows when
sanding
V-Belt too tight
Sanding with too much pressure on
stock
A qualified technician needs to
loosen tension
Apply less pressure when sanding
Sanding Belt runs off
Idler Roller
Not tracking properly Adjust Sanding Belt Tracking
Wood burns while
sanding
Sanding Disc or Belt is loaded with
debris
Clean or replace Disc or Belt.
Sander makes exces-
sive noise
V-Belt too tight A qualified technician needs to
loosen
1.
2.
3.
4.
1.
2.
3.
4.
5.