


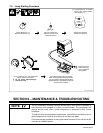


OM-478 Page 38
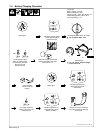
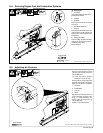
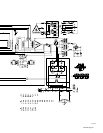
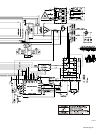
8-8. Checking And Replacing Engine Belt
Ref. ST-121 577-B / Ref. ST-184 781-A
Y Stop engine.
A V-belt drives the engine cooling
fan and alternator. To check
tightness of belt, proceed as
follows:
Remove rear panel and guard from
engine pulley.
1 Fan Pulley
2 Alternator Pulley
3 Engine Belt
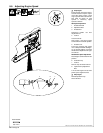
Position straight edge along top of
pulleys. Pull down belt as far as it
will go, and measure distance from
belt to straight edge.
If less than 1/2 in (13 mm), belt is
okay. If not okay, adjust belt as
follows:
4 Alternator Bracket
Loosen hex nut on bracket.
5 Alternator Pivot Hex Nut
Loosen hex nut. Pivot alternator
clockwise until belt is tight. Tighten
hex nuts.
Recheck tightness of belt. Readjust
if necessary.
Replace belt if damaged or
cracked. Replace belt as follows:
Loosen hex nuts, pivot alternator
counterclockwise, and remove
belt. Install new belt, pivot alternator
clockwise, adjust tightness, and
tighten hex nuts. Recheck tight-
ness of belt after operating engine
15 minutes.
Reinstall guard and rear panel.
Tools Needed:
1/2 in, 13 mm, 17mm
1
2
3
4
5
1/2 in (13 mm)
Maximum
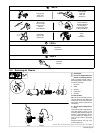
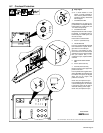
8-9. Servicing Optional Spark Arrestor
ST-157 313-A / Ref. ST-184 781-A
Y Stop engine and let cool.
1 Spark Arrestor
2 Cleanout Plug
Remove plug and remove any dirt
covering cleanout hole.
3 Exhaust Pipe
Start engine, and run at idle speed
to blow dirt out cleanout hole. If
nothing blows out of hole, briefly
cover end of exhaust pipe.
Y Stop engine and let cool.
Reinstall cleanout plug.
1
2
3
Tools Needed:
3/8 in