


33
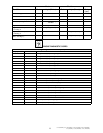
7/120 (P425AWIR), 9/110 (XP375AWIR), 10/105 (HP375AWIR), 14/85 (VHP300AWIR),
7/170 (P600WIR), 10/125 (HP450WIR), 14/115 (VHP400WIR)
Lubrication & Maintenance/Daily
Daily Pre–starting Checks
Do the following BEFORE STARTING THE
ENGINE for the first time each day:
Check engine oil level on dipstick.
IMPORTANT: DO NOT add makeup oil until
the oil level is BELOW the crosshatch marks
on the dipstick.
IMPORTANT: DO NOT fill above the top mark
on the dipstick. Oil levels anywhere within
crosshatch are considered in the acceptable
range.
To change engine oil and oil filter:
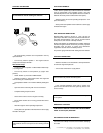
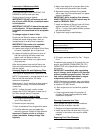
Check the fuel filters for water or debris. If filter
is fitted with a see–through bowl, drain as
needed based on a daily visual inspection.
IMPORTANT: Drain water into a suitable
container and dispose of properly.
a) Loosen drain plugs (A) at bottom of fuel filters
or bowls, if equipped, two or three turns.
b) Loosen air bleed plug (B) two full turns on
fuel filter mounting and drain water from
bottom until fuel starts to drain out.
c) When fuel starts to drain out, tighten drain
plugs securely.
After draining water from the fuel filters, the
filters must be primed by bleeding all air from
the fuel system.
Changing Engine Oil and Replacing Filter
Your engine is equipped with a special oil filter.
NOTE: During break–in, change engine oil and
filter for the first time before 100 hours
maximum of operation.
After break–in, the oil and filter change interval
is 500 hours or every 12 months, whichever
comes first.
NOTE: If diesel fuel with a sulfur content
greater than 0.05% (500 ppm) is used, the oil
and filter change interval is reduced.
To change engine oil and oil filter:
1. Run engine approximately 5 minutes to warm
up oil. Shut engine off.
2. Remove oil pan drain plug.
3. Drain crankcase oil from engine while warm.
4. Turn filter element using a suitable filter
wrench to remove. Discard oil filter element.
Important: Filtration of oils is critical to
proper lubrication. Always change filter
regularly.
5. Apply clean engine oil to the new filter at the
inner and outer seals and to filter threads.
6. Wipe both sealing surfaces of the header
with a clean rag. Ensure dust seal is in place,
replace if damaged.
IMPORTANT: When installing filter element,
HAND TIGHTEN only. A filter wrench may be
used for REMOVAL ONLY.
7. Install and tighten oil filter by hand until firmly
against dust seal. DO NOT apply an extra
3/4 to 1–1/4 turn after gasket contact as done
with standard filters.
8. Tighten drain plug to specifications.
Specification
Oil Pan Drain Plug With Copper Washer—
Torque 70 N•m (52 lb ft)
Oil Pan Drain Plug With O–Ring—
Torque 50 N•m (37 lb ft)
9. Fill engine crankcase with Pro–Tect Engine
Fluid.
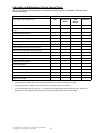
To determine the correct oil fill quantity for your
engine, see ENGINE CRANKCASE OIL FILL
QUANTITIES in the Specifications Section of
this manual.
IMPORTANT: Immediately after completing
any oil change, crank engine for 30 seconds
without permitting engine to start. This will
help insure adequate lubrication to engine
components before engine starts.
NOTE: Crankcase oil capacity may vary slightly.
ALWAYS fill crankcase within crosshatch marks
on dipstick. DO NOT overfill.
10. Start engine and run to check for possible
leaks.
11. Stop engine and check oil level after 10
minutes. Oil level reading should be within
crosshatch of dipstick.
Cleaning Crankcase Vent Tube
If you operate the engine in dusty conditions,
clean the tube at shorter intervals.
1. Remove and clean crankcase vent tube.
2. Install the vent tube. Be sure the O–ring fits
correctly in the rocker arm cover for elbow
adapter.
Replacing Fuel Filter Elements