


12
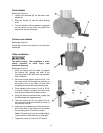
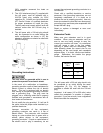
Return Spring Adjustment
The return spring is adjusted at the factory and
should not need further adjustment. If adjustment
is deemed necessary, follow the steps below
while referring to Figure 12:
1. Unplug the machine from the power source.
2. Loosen two hex nuts (A). Do not remove.
Do not remove the coil spring
cover (Step 3). The torsion spring will uncoil
and can cause serious injury.
3. Firmly hold the coil spring cover (B).
4. Pull out the cover and rotate until the pin (C)
on the return spring plate engages the next
notch in the coil spring cover. Turn the cover
clockwise to decrease tension and counter-
clockwise to increase tension.
5. Tighten two hex nuts (A). Do not over-tighten.
Nuts should not contact the housing when
tight. The hex nuts should be tightened
against each other.
Work Light
Install a light bulb, no larger than 60 watts into the
socket accessed from beneath the head. The
rocker switch controls the light switch (D, Fig. 12).
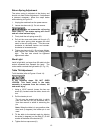
Table Tilt Adjustment
To tilt the table (refer to Figures 13 and 14):
In the following steps, DO NOT OVER
LOOSEN. This could result in the table
assembly to separate from the column, fall
and cause injury.
1. Using a 15/16" wrench, loosen the hex cap
screw (B), located under the table, about one
turn.
2. Pull the locator pin out.
The pin may be seated quite tight; in which
case turn the hex nut (B) clockwise with a
3mm hex wrench to assist in extracting the
pin
Note: When the table is in any position other
than level (0 degrees), the locator pin is not
used.
3. Tilt the table to the desired angle by aligning
the scale (in degrees) on the table (C) to the
marker at the base of the bracket (D).
4. Tighten the hex cap screw (A).
Figure 12
Figure 13
Figure 14