


9
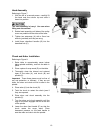
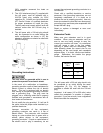
Crank Handle
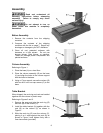
Referring to Figure 4:
1. Loosen the setscrew (B) on the table crank
handle (A).
2. Slide the handle (A) onto the table bracket
shaft.
3. Turn the handle until the setscrew is opposite
the flat section on the shaft, and tighten the
setscrew to secure the handle.
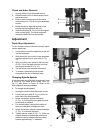
Column Lock Handle
Referring to Figure 5:
Thread the column lock handle (A) into the table
bracket (B).
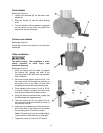
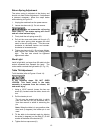
Table Installation
The table is heavy! This installation is a two
person operation to avoid injury from
accidental dropping.
Referring to Figure 6:
1. Have one person hold the table (A) against
the bracket (B), aligning the hole in the
mounting plate of the table with the threaded
hole in bracket.
2. Have the second person insert the 5/8"-11x2
hex head screw (C) through the opening on
the bottom side of the table (A) and start
threading the screw into the bracket by hand.
3. Finish tightening the screw (C) with a 15/16"
or wrench (wrench provided), but leave loose
enough so the table can be tilted by hand.
4. Using the scale on the bracket as a guide, set
the table angle to 0 degrees (level).
5. Take the locator pin (D) and adjust the hex
nut towards the end of the thread as shown in
the close up view (D).
6. Insert the non-threaded end of the locator pin
(D) into the hole on the table found just below
the mounting screw. Press all the way in.
Note: The table may have to be tilted slightly
back and forth if the holes do not quite align.
7. Tighten the screw (C) with a 15/16" wrench.
Figure 4
Figure 5
Figure 6