


13
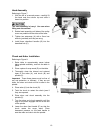
Operation
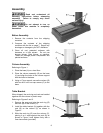
Installing Drills
Insert the drill into the chuck jaws with about
1" insertion. When using a small drill do not
insert it so far that the jaws touch the flutes of
the drill. Make sure that the drill is centered in
the chuck before tightening the chuck with the
key.
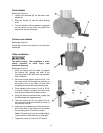
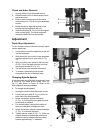
Positioning the Workpiece
Always place a piece of wood (or plywood) on
the table. This will prevent "splintering" or
making heavy burrs on the underside of the
workpiece as the drill breaks through. The wood
should contact the left side of the column.
Using the Vise
For the small workpiece that cannot be clamped
to the table, use a drill press vise. The vise must
be clamped or bolted to the table. Always use a
back-up piece of scrap wood to cover the table.
This protects both the table and the drill bit.
Basic Operation
Place material to be drilled in such as way as to
come into contact with the left side of the
column. This prevents the material from
spinning.
If the work piece is not large enough to come
into contact with the column, use a clamp or
drill press vise that is securely fastened to
the table! Failure to comply may cause
serious injury!
Feed the bit into the material with only enough
force to allow the drill bit to work. Feeding too
slowly may cause burning of the workpiece.
Feeding too quickly may cause the motor to stop
and/or the drill bit to break.
Generally speaking, the smaller the drill bit, the
greater the RPM required. Wood requires higher
speeds than metal. Metal is usually drilled at
slower speeds.
In dusty environments, frequently blow out any
dust that accumulates inside the motor.
Maintenance
Before any intervention on the machine,
disconnect it from the electrical supply by
pulling out the plug or switching off the main
switch! Failure to comply may cause serious
injury.
A coat of automobile-type wax applied to the
table and column will help to keep the surfaces
clean.
If the power cord is worn, cut, or damaged in
any way, have it replaced immediately.
Lubrication
All of the ball bearings are packed with grease at
the factory. They require no further lubrication.
Periodically lubricate the gear, rack, table
elevation mechanism, the splines (grooves) in
the spindle, and the teeth of the quill with a #2
tube grease.
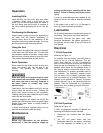
Electrical
115 Volt Operation
Referring to Figure 15:
As received from the factory, your drill press is
ready to run at 115-volt operation. This drill
press, when wired for 115 volt, is intended for
use on a circuit that has an outlet and a plug that
looks like the one illustrated in (A). A temporary
adapter, which looks like the adapter shown in
(B), may be used to connect this plug to a two-
pole receptacle if a properly grounded outlet is
not available. The temporary adapter should
only be used until a properly grounded outlet
can be installed by a qualified electrician. This
adapter is not applicable in Canada. The green
colored rigid ear, lug, or tab, extending from the
adapter, must be connected to a permanent
ground such as a properly grounded outlet box.
Figure 15
230 Volt Operation
Referring to Figure 16:
If 230V, single-phase operation is desired, the
following instructions must be followed:
1. Disconnect the machine from the power
source.
2. The JET drill press motor has four
numbered leads that are factory connected
for 115V operation, as shown in (A). For