


8
Assembly and Setup
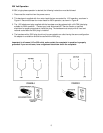
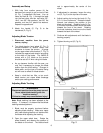
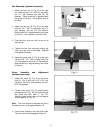
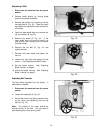
1. With help from another person tilt the
bandsaw just enough to get one set of feet
(A, Fig. 1) underneath the base. Line up
holes and bolt (B, Fig. 1) through the base
into the feet using two hex cap bolts 3/8”-
16x4”, two 3/8” lock washers, two 3/8” flat
washers, and two 3/8” plastic flat washers.
Repeat for opposite end.
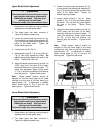
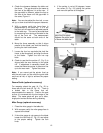
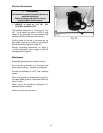
2. Attach the handle (C, Fig. 2) to the
handwheel (D, Fig. 2).
Adjusting Blade Tension
1. Disconnect machine from the power
source, unplug.
2. Turn blade tension hand wheel (E, Fig. 2)
counter-clockwise to tension blade, and
clockwise to loosen the tension. A gauge
on the upper wheel slide bracket (F, Fig. 2)
indicates the approximate tension according
to the width of the blade. The JWBS-16
comes with a 3/4” blade so the tension
should be set at 3/4” when using this blade.
• As you become familiar with the saw, you
may find it necessary to change the blade
tension from the initial setting. Changes in
blade width, and the type of material being
cut will have an effect on blade tension.
• Keep in mind that too little, or too much
blade tension can cause blade breakage
and/or poor cutting performance.
Adjusting Blade Tracking
WARNING
Disconnect machine from the power source!
Never adjust blade tracking with the
machine running!
Failure to comply may cause serious injury!
Note: Blade tracking has been adjusted at the
factory. If, however, it is determined that blade
tracking needs adjustment:
1. Blade must be properly tensioned before
adjusting blade tracking. Make sure upper
and, lower blade guides do not interfere with
the blade while adjusting the tracking.
2. Open the upper wheel door. Rotate the
wheel forward, and observe the position of
the blade on the wheel. The blade should
rest in approximately the center of the
wheel.
3. If adjustment is necessary, loosen the wing
nut (G, Fig. 2) at the top rear of the saw.
4. Adjust tracking by turning the knob (H, Fig.
2) in 1/4 turn increments. Rotate the wheel
forward, and observe the position of the
blade on the wheel. Rotating knob (H, Fig.
2) counter-clockwise should move the blade
towards the front of the wheel. Rotating
the knob clockwise should move the blade
towards the back of the wheel.
5. Continue with adjustments until the blade is
tracking properly.
6. Tighten the wing nut (G, Fig. 2).