13
3. Perform the desired procedure.
4. Unscrew the index pin until the spindle is
released. Rotate spindle to next desired hole,
and repeat.
Remove spindle index pin
before starting lathe.
IMPORTANT: Do not use index pin to lock spindle,
which will cause unnecessary wear to the pin. Use
spindle lock for this purpose.
8.9 Spur center: Installing/removing
The live center is installed into the headstock
spindle. The live center should first be mounted to
your workpiece, and then installed into the spindle.
See section 10.4.
1. Disconnect lathe from power source.
2. Clean the tapered end of the center, and the
inside of the headstock spindle, then push the
center into the headstock spindle.
3. To remove a live center, first remove
workpiece from lathe. Insert knockout rod
(Figure 15) through hole in handwheel and tap
the tapered end of the spur center.
IMPORTANT: Hold the center by either
placing your thumb and forefinger on outside
diameter of spur center, or wrapping the center
with a rag. The center can be damaged if
allowed to fall.
Figure 15
8.10 Live center: Installing/removing
The live center is installed into the tailstock quill.
1. Disconnect lathe from power source.
2. Clean the tapered end of the center and the
inside of the tailstock quill, then push the
center into the quill. Test the insertion by
attempting to pull the center out of the quill by
hand. It should remain secure within the quill.
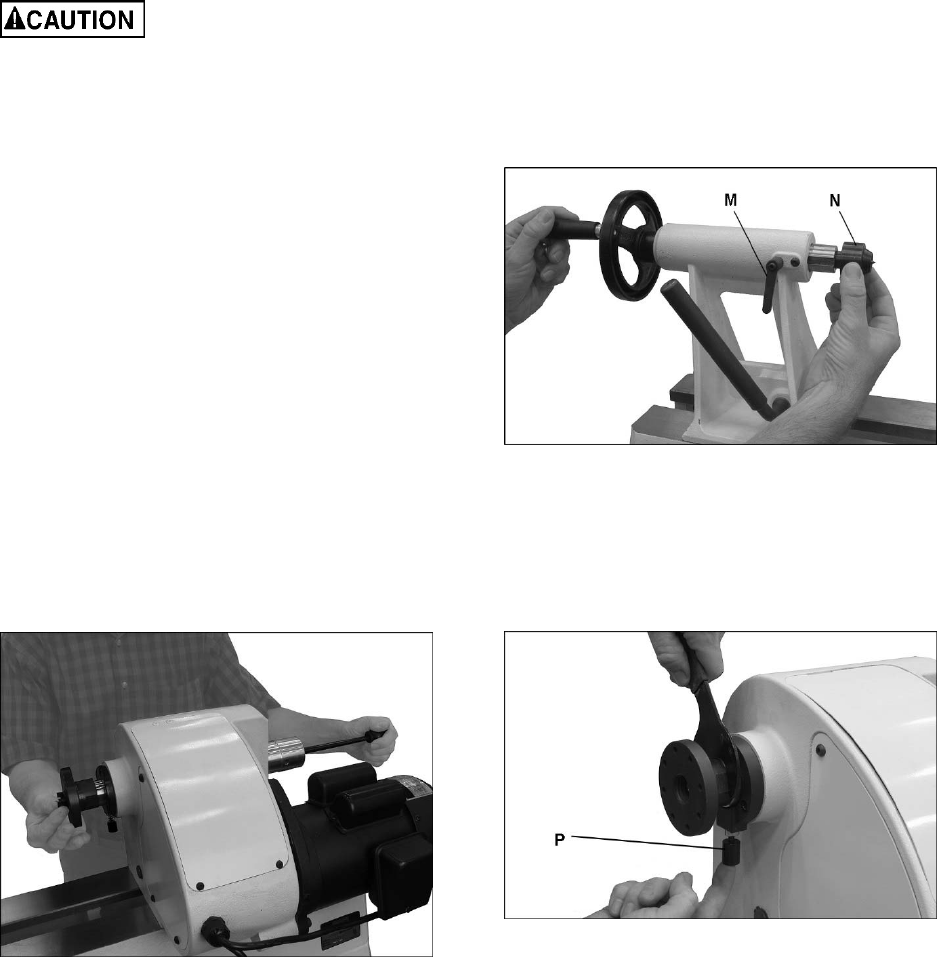
3. Always tighten the quill locking handle (M,
Figure 16), once the live center has been
properly positioned in the workpiece. Make
sure the keyway (N, Figure 16) in the quill is
aligned with the locking handle.
To remove the live center:
4. Back off the tailstock and remove workpiece
from lathe.
5. Loosen quill lock handle (M, Figure 16).
6. Rotate the handwheel counterclockwise to
retract quill all the way, until the live center
comes out. Hold the center while doing this to
prevent it from falling.
Figure 16
8.11 Spindle lock
Push spindle lock pin (P, Figure 17), and rotate the
spindle slightly until the pin goes entirely into the
recess. Continue to hold spindle lock pin in the
recess.
Figure 17
8.12 Face plate: Installing/removing
1. Disconnect lathe from power source.
2. Mount the face plate to your workpiece.
3. Engage spindle lock pin.
4. Install face plate onto threads of headstock
spindle and rotate clockwise as far as it will go.
5. Face plate is now ready for turning.
6. To remove the face plate, engage spindle lock,
and turn face plate counterclockwise with face
plate wrench.


