


20
10.7.2 To Shape Interior of Bowl
1. Stop lathe and move tailstock away. (You may
want to remove the center from the tailstock to
avoid bumping it with your elbow.)
2. Adjust tool support in front of the bowl just
below centerline, at a right angle to the lathe
ways.
3. Rotate workpiece by hand to check clearance.
4. Face off top of bowl by making a light shearing
cut across the top of workpiece, from rim to
center.
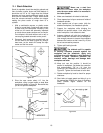
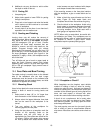
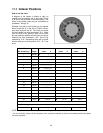
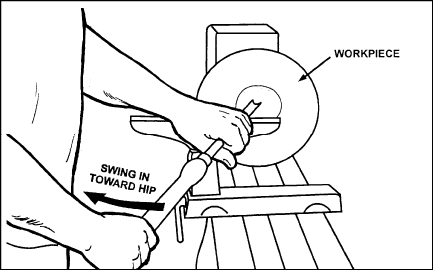
5. Place 1/2" bowl gouge on tool support at
center of the workpiece with the flute facing
top of bowl. The tool handle should be level
and pointed toward the four o'clock position, as
shown in Figure 31.
Figure 31
6. Use the left hand to control cutting edge of
gouge, while right hand swings tool handle
toward your body (Figure 31). The flute should
start out facing top of workpiece, and rotate
upward as it moves deeper into the bowl to
maintain a clean even curve. As the tool goes
deeper into the bowl, progressively work out
toward the rim. It may be necessary to turn the
tool support into the piece as you get deeper
into the bowl.
(NOTE: Try to make one, very light continuous
movement from the rim to the bottom of the
bowl to ensure a clean, sweeping curve
through the piece.
Should there be a few small ridges left, a light
cut with a large domed scraper can even out
the surface.)
7. Develop wall thickness at the rim and maintain
it as you work deeper into the bowl (Once the
piece is thin toward the bottom, you cannot
make it thinner at the rim). When the interior is
finished, move the tool support to exterior to
re-define bottom of bowl. (General rule of
thumb: the base should be approximately 1/3
the overall diameter of the bowl).
8. Work the tight area around faceplate or chuck
with 1/4" bowl gouge.
9. Begin the separation with a parting tool, but do
not cut all the way through yet.
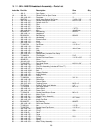
10.7.3 Sanding and Finishing
1. Remove the tool support and adjust lathe
speed to approximately 500 RPM. Higher
speeds can build friction while sanding and
cause heat check in some woods.
2. Begin with fine sandpaper (120 grit) and
progress through each grit, using only light
pressure. Coarser sandpaper tends to leave
deep scratches that are hard to eliminate. Use
power-sanding techniques to avoid concentric
sanding marks around your finished piece.
Avoid rounding over the rim and foot with
sandpaper; try to keep details crisp. Finish
sanding with 220 grit.
3. Remove sanding dust with tack rags or
compressed air and, with lathe turned off,
apply first coat of finish. Let stand for several
minutes, wipe off excess. Allow to dry before
sanding again with 320 or 400 grit sandpaper.
4. Turn lathe back on and continue the
separation cut almost all the way through the
base. Stop at about 3" and use a small fine
tooth saw to separate the bowl from the waste.
5. Apply second finish coat and allow to dry
before buffing.