


14
Functions
Leica DISTO™ D8 LCA782205a gb
D
GB
F
I
E
P
NL
CN
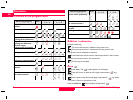
Press and
hold
the key to display additional information about the
measurement, for example the inclination angle , the measured distance
and the indirect height .
See drawing {
M
}.
Double tilt measurement with one measured distance
This procedure is particularly helpful if one target point of those to be
measured cannot be reflective. The second target point can be simply
pointed at with the digital viewfinder. In this measurement it is the angle
only and not the distance that is measured and therefore no special target
is required for the laser.
See drawing {
S
}.
Press the button three times. The following symbol appears in
the display.
Press the button - tilt and distance are measured. If the tilt changes,
the device updates the resulting height value and displays it in the summary
row.
Press the button - only the tilt is measured and the value of the
resulting indirect height is frozen in the summary row .
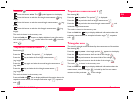
Press and hold the button to display additional information about the
measurement, such as the horizontal distance , the distance to the
second measured point , or the height to the same point (please
note the different icons).
Double tilt measurement with two measured distances
This procedure is particularly suitable if the two measured points do not
lie in the same vertical plane. The two target points are each measured
using a distance and a tilt measurement.
See drawing {
T
}.
Press the button four times. The following symbol appears in
the display.
Press the button - tilt and distance are measured.
Press the button
- tilt and distance are measured. The summary
row shows the resulting distance between the two measured points .
Press and hold the button to display additional information about the
measurement, such as the horizontal distance , the height difference
between the measured points , or the included angle .
)
Measure to the top target point first. This point must lie behind the
bottom target point. If this is not the case, an error message appears in the
display.
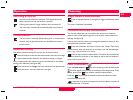
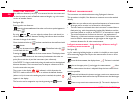
Profile measurement
This function is used to measure profiles and terrain sections. After measu-
ring a reference point with a known height (e.g. bench mark or floor), the
height and horizontal distance to the instrument are displayed for each
following point.
)
We recommend using a tripod!
Press the key five times.
The following symbol appears on the display: .
With and enter the known height of the reference point (e.g. -
4,000 m in a construction system) and confirm with . The following
symbol then appears on the display: .
Now aim the instrument at the height reference point and press the
key - the gradient and distance are measured. The instrument is then ready
to measure profile points .
Measure the profile points by pressing the key. The horizontal
distance from the instrument to the measured point and the height
of the point are displayed.
Press to exit the function.