


B-6
OPERATION
B-6
PRECISION TIG 225
OPERATING STEPS
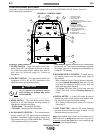
WELDING IN TIG MODE
1. Connect the TIG torch and cable Twist-Mate quick
connect plug to the Electrode/Gas output recepta-
cle. This receptacle also contains an integral gas
connection for the torch. Connect the work clamp to
the work piece.
2. Set the TIG/STICK switch to “TIG”.
3. Set the Polarity Switch to DC- for welding steel or
stainless steel; or to AC for welding aluminum.
4. Connect the Foot Amptrol to the Remote Control
Connector.
5. Turn on the cylinder gas valve and adjust the flow
regulator to obtain desired flow.
6. Turn the power switch to “ON”. NOTE: There will be
a 15 second gas flow when the power is turned on.
7. Preset the Output Control on the control panel to
the maximum desired amps, as read on the digital
meter.
8. Depress the Foot Amptrol to energize the torch and
establish an an arc with the work piece. The digital
meter reads the actual amps while welding.
NOTE: When the TIG/STICK switch is set to “TIG”,
depressing the remote control will start a 0.5 second
gas pre-flow before energizing the TIG torch. When
the remote control is released the TIG torch is de-
energized and gas flow will continue for the time set
by the Post Flow Time control. When the polarity
switch is set to DC, the TIG Arc Starter will turn on
and off automatically to start and stabilize the arc. In
AC the TIG Arc Starter will turn on with the output and
remain on continuously until the remote control is
released.
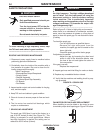
PULSE TIG CONTROL
Use this knob to set the frequency or the number of
pulses per second(pps), from 0.1pps to 20pps.
• This setting adjusts heat output and bead shape for
travel speed. Thinner plate that is welded with faster
travel speed will require higher frequency than thick-
er plate with slower travel speed. 2-3pps is a typical
starting point.