


D-2
MAINTENANCE
D-2
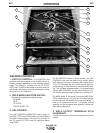
ENGINE OIL CHANGE
Drain the oil while the engine is warm to assure rapid
and complete draining.
• Remove the oil filler cap and dipstick. Remove the
yellow cap from the oil drain valve and attach the
flexible drain tube supplied with the machine. Push
in and twist the drain valve counterclockwise. Pull
the valve out and drain the oil into a suitable contain-
er.
• Close the drain valve by pushing in and twisting
clockwise. Replace the yellow cap.
• Refill to the upper limit mark on the dipstick with the
recommended oil. Tighten the oil filler cap securely.
ENGINE OIL REFILL CAPACITIES
Without oil filter replacement:
•1.7 US qt. (1.4 Imp qt., 1.6 liter)-Kohler
•1.5 US qt. (1.2 Imp qt., 1.4 liter)-Onan P220 OHV
With oil filter replacement:
•2.0 US qt. (1.7 Imp qt., 1.9 liter)-Kohler
•1.65 US qt. (1.4 Imp qt., 1.6 liter)-Onan P220 OHV
Use 4-stroke motor oil that meets or exceeds the
requirements for API service classification SG or SH.
Always check the API SERVICE label on the oil con-
tainer to be sure it includes the letters SG or SH.
SAE 10W-30 is recommended for general, all-temper-
ature use, -5 F to 104 F (-20 C to 40 C). For the Onan
engine, it is recommended that SAE 30 oil be used
above 82 F (27 C).
See Engine Owner’s Manual for more specific infor-
mation on oil viscosity recommendations.
Wash your hands with soap and water after handling
used oil.
Please dispose of used motor oil in a manner that is
compatible with the environment. We suggest you
take it in a sealed container to your local service sta-
tion or recycling center for reclamation. Do not throw it
in the trash, pour it on the ground or down a drain.
OIL FILTER CHANGE
1. Drain the engine oil.
2. Remove the oil filter, and drain the oil into a suitable
container. Discard the used oil filter.
3. Clean the filter mounting base, and coat the gasket
of the new oil filter with clean engine oil.
4. Screw on the new oil filter by hand, until the gasket
contacts the filter mounting base, then use an oil fil-
ter socket tool to tighten the filter an additional 1/2
to 7/8 turn.
5. Refill the crankcase with the specified amount of
the recommended oil. Reinstall the oil filler cap.
6. Start the engine and check for oil filter leaks.
7. Stop the engine, and check the oil level. If neces-
sary, add oil to the upper limit mark on the dipstick.
AIR CLEANER SERVICE
A dirty air cleaner will restrict air flow to the carbure-
tor. To prevent carburetor malfunction, service the air
cleaner regularly. Service more frequently when
operating the engine in extremely dusty areas.
• Never use gasoline or low flash point solvents
for cleaning the air cleaner element. A fire or
explosion could result.
• Never run the engine without the air cleaner.
Rapid engine wear will result from contaminants,
such as dust and dirt being drawn into the
engine.
-----------------------------------------------------------------------
AIR PRE-CLEANER SERVICE
1. Loosen the cover retaining knob and remove the
cover.
2. Remove the pre-cleaner from the paper element.
3. Wash the pre-cleaner in warm water with detergent.
Rinse the pre-cleaner thoroughly until all traces of
detergent are eliminated. Squeeze out excess
water (do not wring). Allow the pre-cleaner to air
dry.
4. Saturate the pre-cleaner with new engine oil.
Squeeze out all excess oil.
5. Reinstall the pre-cleaner over the paper element.
6. Reinstall the air cleaner cover. Secure cover with
the cover retaining knob.
RANGER 250
CAUTION
WARNING