


11
Cross cutting
CAUTION:
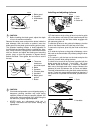
• When making a crosscut, remove the rip fence from
the table.
• When cutting long or large workpieces, always
provide adequate support to the sides of the table.
The support should be at the same height as the
table.
• Always keep hands away from path of blade.
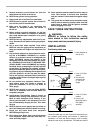
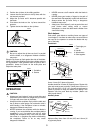
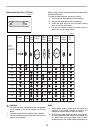
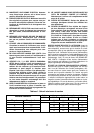
Miter gauge
Use the miter gauge for the 4 types of cutting shown in
the figure.
CAUTION:
• Secure the knob on the miter gauge carefully.
• Avoid creep of workpiece and gauge by firm
workholding arrangement, especially when cutting
at an angle.
• NEVER hold or grasp the intended “cut-off” portion
of the workpiece.
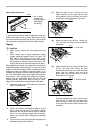
Miter gauge positive stop
Miter gauge is provided with positive stops at 90°,
45°right and left miter angles for quick setting of miter
angles.
To set the miter angle, loosen the knob on the miter
gauge.
Raise the small plate on the miter gauge for free setting.
Turn the miter gauge to the desired miter angle. Return
the small plate on the miter gauge to the original position
and tighten the knob clockwise securely.
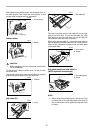
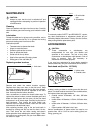
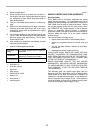
Use of miter gauge
Slide the miter gauge into the thick grooves in the table.
Loosen the knob on the gauge and align to desired angle
(0° to 60°). Bring stock flush up against fence and feed
gently forward into the blade.
Auxiliary wood facing (miter gauge)
To prevent a long board from wobbling, fit the miter
gauge with an auxiliary fence board. Fasten with bolts/
nuts after drilling holes, but fasteners must not protrude
from the face board.
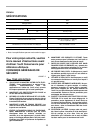
Carrying tool
Carry the tool by holding the tool part shown in the figure.
1. Push block
2. Auxiliary fence
1. CROSS CUT-
TING
2. MITERING
3. BEVEL CUT-
TING
4. COMPOUND
MITERING
(ANGLES)
1. Knob
2. Small plate
3. Screw for posi-
tive stop
1
2
006220
12
34
006166
1
3
2
006225
1. Groove
2. Miter gauge
3. Knob
1
2
3
006167
006168
006213