


7
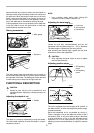
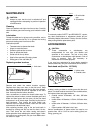
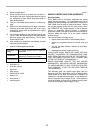
Sub table (back) can be installed at the back of the table
to assure wider space. Sub table (L) can be installed on
the left side of the table.
ASSEMBLY
CAUTION:
• Always be sure that the tool is switched off and
unplugged before carrying out any work on the tool.
The tool is shipped from the factory with the saw blade
and blade guard not in the installed condition. Assemble
as follows:
Installing or removing saw blade
CAUTION:
• Always be sure that the tool is switched off and
unplugged before installing or removing the blade.
• Use only the Makita socket wrench provided to
install or remove the blade. Failure to do so may
result in overtightening or insufficient tightening of
the hex bolt. This could cause an injury.
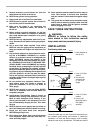
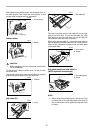
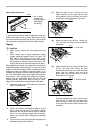
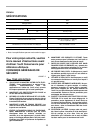
Remove the table insert on the table. Hold the outer
flange with the offset wrench and loosen the hex nut
counterclockwise with the wrench. Then remove the
outer flange.
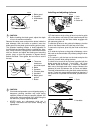
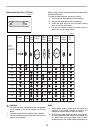
Assemble the inner flange, blade, outer flange and hex
nut onto the arbor, making sure that the teeth of the blade
are pointing down at the front of the table. Always install
the hex nut with its recessed side facing the outer flange.
CAUTION:
• Keep the flange surface clean of dirt or other
adhering matter; it could cause blade slippage. Be
sure that the blade is installed so that the teeth are
aligned in the cutting (turning) direction.
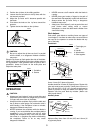
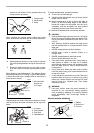
To secure the blade in place, hold the outer flange with
the offset wrench, then tighten the hex nut clockwise with
the wrench. BE SURE TO TIGHTEN THE HEX NUT
SECURELY.
CAUTION:
• Be sure to hold the hex nut carefully with the
wrench. If your grip should slip, the wrench may
come off the hex nut, and your hand could strike the
sharp blade edges.
Installing blade guard
1. Screw
2. Sub table (L)
1. Offset wrench
2. Hex nut
3. Wrench
2
1
006151
1
3
2
006135
1. Inner flange
2. Outer flange
3. Saw blade
4. Hex nut
1. Offset wrench
2. Wrench
1. Blade guard
2. Spreader
3. Blade guard
mounting por-
tion (stay)
12
3
4
006136
12
006138
1
2
3
006140