


ADDITIONAL SAFETY RULES
FOR MACHINE
1. Be aware that this machine is always in an
operating condition, because it does not have
to be plugged into an electrical outlet.
2. Always be sure you have a firm footing. Be
sure no one is below when using the machine
in high locations.
3. Hold the machine firmly.
4. When driving into walls, floors or wherever
‘‘live’’electricalwires may beencountered, DO
NOT TOUCH ANY METAL PARTS OF THE
MACHINE! Hold the machine only by the insu-
lated grasping surfaces to prevent electric
shock if you drive into a ‘‘live’’ wire.
5. Check the socket carefully for wear, cracks or
damage before installation.
SAVE THESE INSTRUCTIONS.
OPERATING INSTRUCTIONS
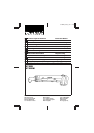
Installing or removing battery cartridge
(Fig. 1)
•
Always switch off the machine before insertion or
removal of the battery cartridge.
•
To remove the battery cartridge, pull out the set
plate on the machine and grasp both sides of the
cartridge while withdrawing it from the machine.
•
To insert the battery cartridge, align the tongue on
the battery cartridge with the groove in the housing
and slip it into place. Snap the set plate back into
place. Be sure to close the set plate fully before
using the machine.
•
Do not use force when inserting the battery car-
tridge. If the cartridge does not slide in easily, it is
not being inserted correctly.
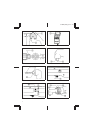
Charging (Fig. 2)
Plug the fast charger into your power source. Insert
the battery cartridge so that the plus and minus
terminals on the battery cartridge are on the same
sides astheir respectivemarkings on thefast charger.
The charging light will come on and charging will
begin. If the charging light goes out soon, remove the
battery cartridge from thecharger and let it cooloff for
more than one minute. Then re-insert it and try to
charge it once more. If the charging light goes out
within one minute even after repeating this procedure
a couple of times, the battery cartridge is dead.
Replace it with a new one. When the charging light
goes out after about one hour, you may remove the
fully charged battery cartridge.
After charging, unplug the charger from the power
source.
Battery type
Capacity
(mAH)
Number of
cells
9100 1,300 8
CAUTION:
•
Your new battery cartridge is not charged. You will
need to charge it before use.
•
If you try to charge a cartridge from a just-operated
machine, sometimes the charging light will not
come on. If this occurs, let the cartridge cool off for
a while. Then re-insert it and try to charge it once
more.
•
When you charge a new battery cartridge or a
battery cartridge whichhas not been used fora long
period, it may not accept a full charge. This is a
normal condition and does not indicate a problem.
You can recharge the battery cartridge fully after
discharging it completely a couple of times.
•
If you wish to charge two battery cartridges, allow
15 minutes between chargings on the fast charger.
Installing or removing socket
Important:
Always be sure that the machine is switched off and
the battery cartridge is removed before installing or
removing the socket.
For machine with square drive (Fig.3&4)
Use 9.5 mm squaredrive socket witha hole fordetent
pin which is available on the market. (Note: Use
6.35 mm squaredrive socketwhen usingthe machine
with 6.35 mm square drive.)
To install the socket, depress the detent pin on the
square drivewith yourfinger andpush thesocket onto
the squaredrive untilthe detentpin is insertedinto the
hole in the socket.
To remove the socket, depress the detent pin with a
small hand tool and pull off the socket.
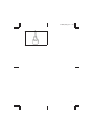
For machine with round drive (Fig. 5)
Use a bit with Form C 6.3 shank which is available on
the market. The bit can be inserted directly into the
round drive and held in place.
To install the bit, push it firmly into the round drive.
To remove the bit,grasp it with a pairof pliers and pull
it out of the round drive. Sometimes, it helpsto wiggle
the bit with the pliers as you pull.
Switch action (Fig. 6)
CAUTION:
Before inserting the battery cartridge into the
machine, always check to see that the switch trigger
actuates properly and returns to the ‘‘OFF’’ position
when released.
To start the machine, simply pull the trigger. Release
the trigger to stop.
6702D (E) (’97. 9. 19)
5