


Reversing switch action (Fig. 7)
CAUTION:
•
Always check the direction of rotation before opera-
tion.
•
Use the reversing switch only after the machine
comes toa complete stop.Changing the directionof
rotation before the machine stops may damage the
machine.
This machine has a reversing switch to change the
direction of rotation. Slide the reversing switch up for
clockwise rotation or slide it down for counterclock-
wise rotation.
Overload protector
The overloadprotector automaticallycuts out tobreak
the circuit whenever heavy work is prolonged. Wait
20 – 30 seconds before resuming operation.
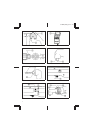
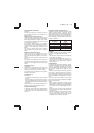
Adjusting the fastening torque (Fig. 8)
The fastening torque can be adjusted infinitely from
approx. 20 kg·cm to 80 kg·cm.To adjust it, loosen the
two screws and turn the adjusting ring. Then tighten
the screws to secure the adjusting ring. Refer to the
table below for relation between the numbers on the
adjusting ringand thefastening torque tobe obtained.
Numbers on
adjusting ring
Fastening torque to
be obtained
1 20 kg·cm
2 35 kg·cm
3 48 kg·cm
4 60 kg·cm
5 80 kg·cm
(Example)
35 kg·cm of fastening torque can be obtained when
the number 2 is aligned to the red mark.
NOTE:
•
Always tighten the two screws to secure the adjust-
ing ring after adjusting the fastening torque.
•
The fastening torquemay differ depending uponthe
kind of screws, the type of materials to be fastened,
etc. Before starting your job, always perform a test
operation to verify the adequate fastening torque.
Operation
The proper fastening torque may differ depending
upon the kind or size of screws, the type of materials
to be fastened, the condition of the threads, etc.
Before starting your job, always perform a test opera-
tion to verify adequate fastening torque.
Hold the machine firmly with both hands whenever
possible and place the socket over the bolt or nut.
Then turn the machine on. As soon as the bolt or nut
becomes tight, the clutch will cut in and the motor will
stop automatically. Release the switch trigger.
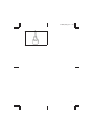
When fastening machine screws, use the proper
screwdriver bit shown in Fig. 9. It is commonly avail-
able on the market.
NOTE:
•
Always use the correct size socket for bolts and
nuts. An incorrect size socket will result in inaccu-
rate and inconsistent fastening torque and/or dam-
age to the bolt or nut.
•
Hold the machine with its square drive pointed
straight at the bolt or nut, or the bolt or nut will be
damaged.
•
If the motor will not start even after you pull the
trigger, release the trigger. Then pull the trigger
again after turning the socket slightly with your
fingers.
Fastening performance
The following reference table indicatesthe approximate fastening capacity from a single1-hour battery charge.
It may differ under some conditions.
Screw size Fastening torque Fastenings
M6x14
5 About 800 screws
1 About 1,000 screws
MAINTENANCE
CAUTION:
Always be sure that the machine is switched off and
the battery cartridge is removed before carrying out
any work on the machine.
To maintain product safety and reliability, repairs,
maintenance or adjustment should be carried out by
Makita Authorized Service Center.
6
6702D (E) (’97. 9. 19)