


[3] DISASSEMBLY/ASSEMBLY
[3] -1. Drill Chuck (cont.)
P 3/ 12
Repair
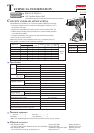
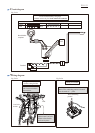
ASSEMBLING
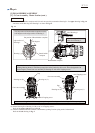
Fig. 5
End of the threaded
portion of Spindle
Drill chuck
Fig. 6
Attach Battery.
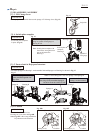
F/R change lever
Set F/R Change lever
to Forward (clockwise)
rotation.
Set Speed change lever to Low speed
mode designated with 1.
Speed change lever
Set Change ring to Drill mode.
Change ring
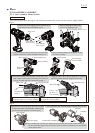
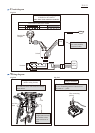
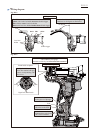
Counterclockwise
Hex wrench 10
Fig. 7
Clockwise
4. Open Drill chuck fully, and tighten Drill chuck
with M6x22 Flat head screw by turning it
counterclockwise with Impact driver.
(1) Set the machine. (Fig. 5 and 6)
(2) Set Hex wrench 10 to vise and described in Fig. 3.
(3) Set Drill chuck in place. (Fig. 7)
M6x22 Flat head screw
(Left handed thread)
Turn Drill chuck clockwise by hand until
it sits on the end of the threaded portion
of Spindle.
Note: Apply adhesive (ThreeBond 1321B/1342 or Loctite 242)
to threaded portion when re-using the removed M6x22
Flat head screw.
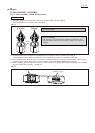
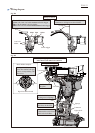
Counterclockwise recoil
force of Machine
*Note: The rotational direction is viewed from operator.
1. Hold Hex wrench 10 with Drill chuck and grip Machine.
Important: Grip Machine hard with both hands to provide
sufficient clockwise* force against
counterclockwise* recoil force of Machine.
2. Pull Switch trigger slowly to turn Spindle clockwise*.
Note: Pull the Trigger so that Spindle’s rotating reaches full
speed in one second.
3. Drill chuck is tightened and consequently Spindle is locked.
Clockwise* force to be
applied by operator