


P 6/ 12
Repair
[3] DISASSEMBLY/ASSEMBLY
[3] -2. Gear Assembly, Motor Section
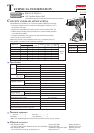
ASSEMBLING
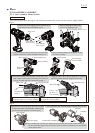
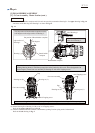
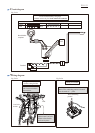
Fig. 12
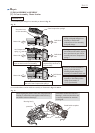
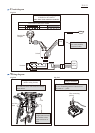
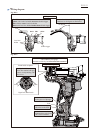
Fig. 13
(5) Assemble Speed change lever assembly as drawn in Fig. 12.
(6) Assemble Motor section and Gear assembly as illustrated in Figs. 13 and 14.
If the Motor section does not fit to
Housing L, make sure that Yoke unit
is correctly amounted to Armature.
See Fig. 10.
Housing Set (L)
rear Compression
spring 4
front Compression spring 4
compressed by the lever of
Gear assembly.
Drill chuck
side
Motor side
Pin on the lever
of Gear assembly
Drill chuck
side
Motor side
Drill chuck
side
Motor side
front Compression spring 4
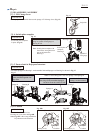
1. Apply the front Compression
spring 4 of Speed change lever
assembly to the flat side
(without pin) of Gear assembly
for Speed change.
2. Push Speed change lever assembly
toward Motor side until it stops to
have space between pin of Gear
assembly and rear Compression
spring 4.
3. Fit the pin of Gear assembly to
Spring’s coil with slowly
returning Speed change lever
assembly toward Drill chuck side.
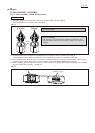
Space between rear Compression spring 4
and pin on the lever of Gear assembly
Pin on the lever of Gear assembly fit to
the coil of rear Compression spring 4
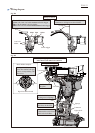
protrusion
notch Yoke unit
Brush holder complete
Gear ass’y
While aligning the notch of Yoke unit with projection of
Housing L, mount Yoke unit together with Gear ass’y
and Motor section to Housing L.
4. Slide Speed change lever
assembly to the either position
2(High speed mode) or
1 (Low speed mode).