


P 8/ 12
Repair
[3] DISASSEMBLY/ASSEMBLY
[3] -3. F/R Change Lever
[3] -5. Parts related to Drip-proof structure
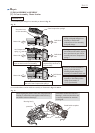
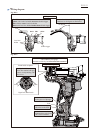
ASSEMBLING
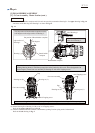
Fig. 17
Assemble Sponge B to Housing L. And assemble Seal and Sponge A to Housing L as drawn in Fig. 17.
Assemble Sponge B to Housing R
to the portion designated with
gray color.
Sponge B
Sponge A
Note: To assure Drop-proof, use new Sponge A and Sponge B.
Assemble Sponge A to Seal.
Note: Edge of the assembled Sponge A
has to be flat to the surface of Seal.
Seal
Housing R
Housing L
Assemble the Seal to
Housing L as drawn below.
Projection
Prong
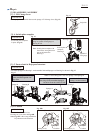
ASSEMBLING
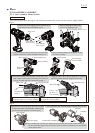
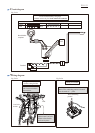
[3] -4. Switch plate complete
ASSEMBLING
Put the projection on Switch between the prongs of F/R change lever. (Fig. 15)
Fig. 15
Housing L
Switch plate
complete
Insert Switch plate complete to Housing L,
facing its symbol of Fuel gauge to
Housing R side.
Note: Switch plate complete with
faced in the wrong direction
can not be inserted to
Housing L.
Symbol of
Fuel gauge
Housing R side
Set Switch plate complete
in place. (Fig. 16)
Fig. 16
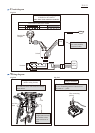
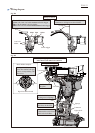
ASSEMBLING
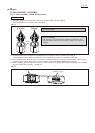
[3]-6. Cushion
Be sure to install Cushion into
Housing set (L) as drawn in Fig. 18R.
Note: Fig. 18F is the wrong installation.
Pay attention to the direction.
[Correct] [Wrong]
CushionHousing set (L) Housing set (L) Cushion
Fig. 18R Fig. 18F