


14
CAUTION:
• Whenever performing the slide cut, FIRST PULL
THE CARRIAGE TOWARD YOU FULLY and press
down the handle to the fully lowered position, then
PUSH THE CARRIAGE TOWARD THE GUIDE
FENCE. NEVER START THE CUT WITH THE
CARRIAGE NOT FULLY PULLED TOWARD YOU.
If you perform the slide cut without pulling the
carriage fully or if you perform the slide cut toward
your direction, the blade may kickback
unexpectedly with the potential to cause serious
PERSONAL INJURY.
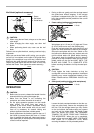
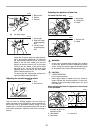
• Never perform the slide cut with the handle locked
in the lowered position by pressing the stopper pin.
• Never loosen the knob which secures the carriage
while the blade is rotating. This may cause serious
injury.
3. Miter cutting
Refer to the previously covered “Adjusting the miter
angle”.
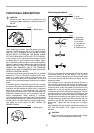
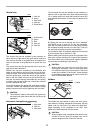
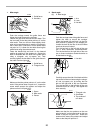
4. Bevel cut
Loosen the lever and tilt the saw blade to set the
bevel angle (Refer to the previously covered
“Adjusting the bevel angle”). Be sure to retighten
the lever firmly to secure the selected bevel angle
safely. Secure the workpiece with a vise. Make sure
the carriage is pulled all the way back toward the
operator. Switch on the tool without the blade mak-
ing any contact and wait until the blade attains full
speed. Then gently lower the handle to the fully
lowered position while applying pressure in parallel
with the blade and PUSH THE CARRIAGE
TOWARD THE GUIDE FENCE TO CUT THE
WORKPIECE. When the cut is completed, switch
off the tool and WAIT UNTIL THE BLADE HAS
COME TO A COMPLETE STOP before returning
the blade to its fully elevated position.
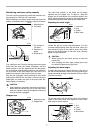
CAUTION:
• Always be sure that the blade will move down to
bevel direction during a bevel cut. Keep hands out
of path of saw blade.
• During a bevel cut, it may create a condition
whereby the piece cut off will come to rest against
the side of the blade. If the blade is raised while the
blade is still rotating, this piece may be caught by
the blade, causing fragments to be scattered which
is dangerous. The blade should be raised ONLY
after the blade has come to a complete stop.
• When pressing down the handle, apply pressure in
parallel with the blade. If a force is applied
perpendicularly to the turn base or if the pressure
direction is changed during a cut, the precision of
the cut will be impaired.
• Always set the sub-fence to the left position when
performing left bevel cuts.
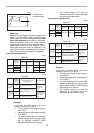
5. Compound cutting
Compound cutting is the process in which a bevel
angle is made at the same time in which a miter
angle is being cut on a workpiece. Compound cut-
ting can be performed at angle shown in the table.
When performing compound cutting, refer to “Press
cutting”, “Slide cutting”, “Miter cutting” and “Bevel
cut” explanations.
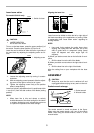
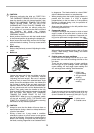
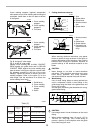
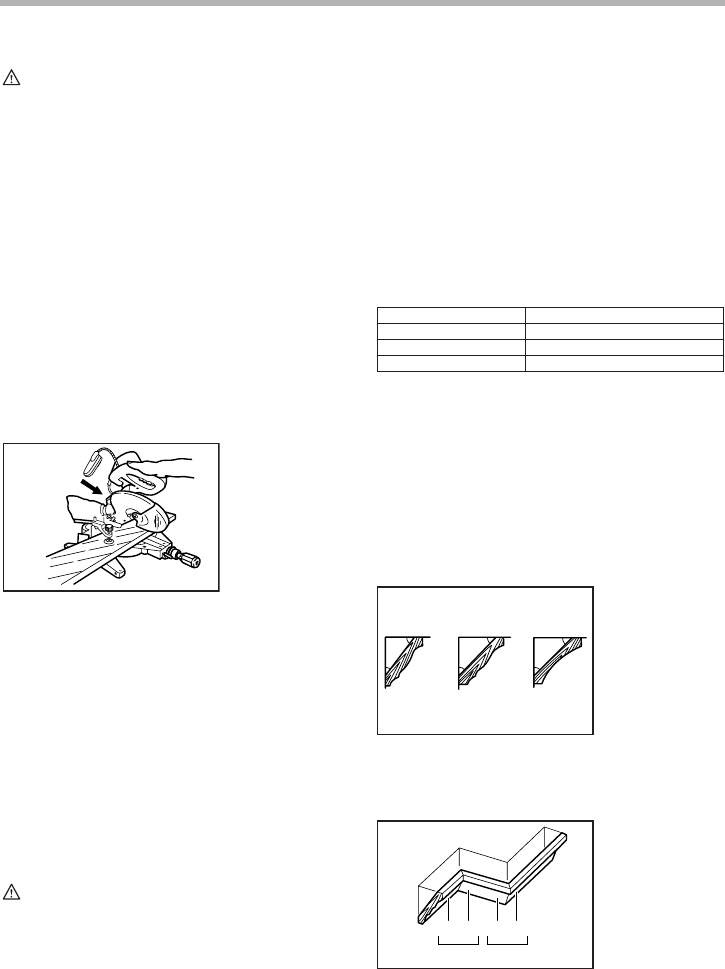
6. Cutting crown and cove moldings
Crown and cove moldings can be cut on a com-
pound miter saw with the moldings laid flat on the
turn base.
There are two common types of crown moldings
and one type of cove moldings; 52/38° wall angle
crown molding, 45° wall angle crown molding and
45° wall angle cove molding. See illustrations.
There are crown and cove molding joints which are
made to fit “Inside” 90° corners ((1) and (2) in Fig.
A) and “Outside” 90° corners ((3) and (4) in Fig. A).
002024
1. 52/38° type
crown molding
2. 45° type crown
molding
3. 45° type cove
molding
1. Inside corner
2. Outside corner
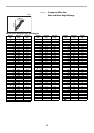
Bevel angle
Left and Right 0˚ - 45˚
Left 0˚ - 45˚ and Right 0˚ - 40˚
Miter angle
Left and Right 45˚
Left 47˚
Right 52˚ Left 0˚ - 30˚ and Right 0˚ - 45˚
006484
52∞
38∞
45∞
45∞
45∞
45∞
123
001555
(1)(2) (3)(4)
1 2
Fig.A
001556