27
ENGLISH
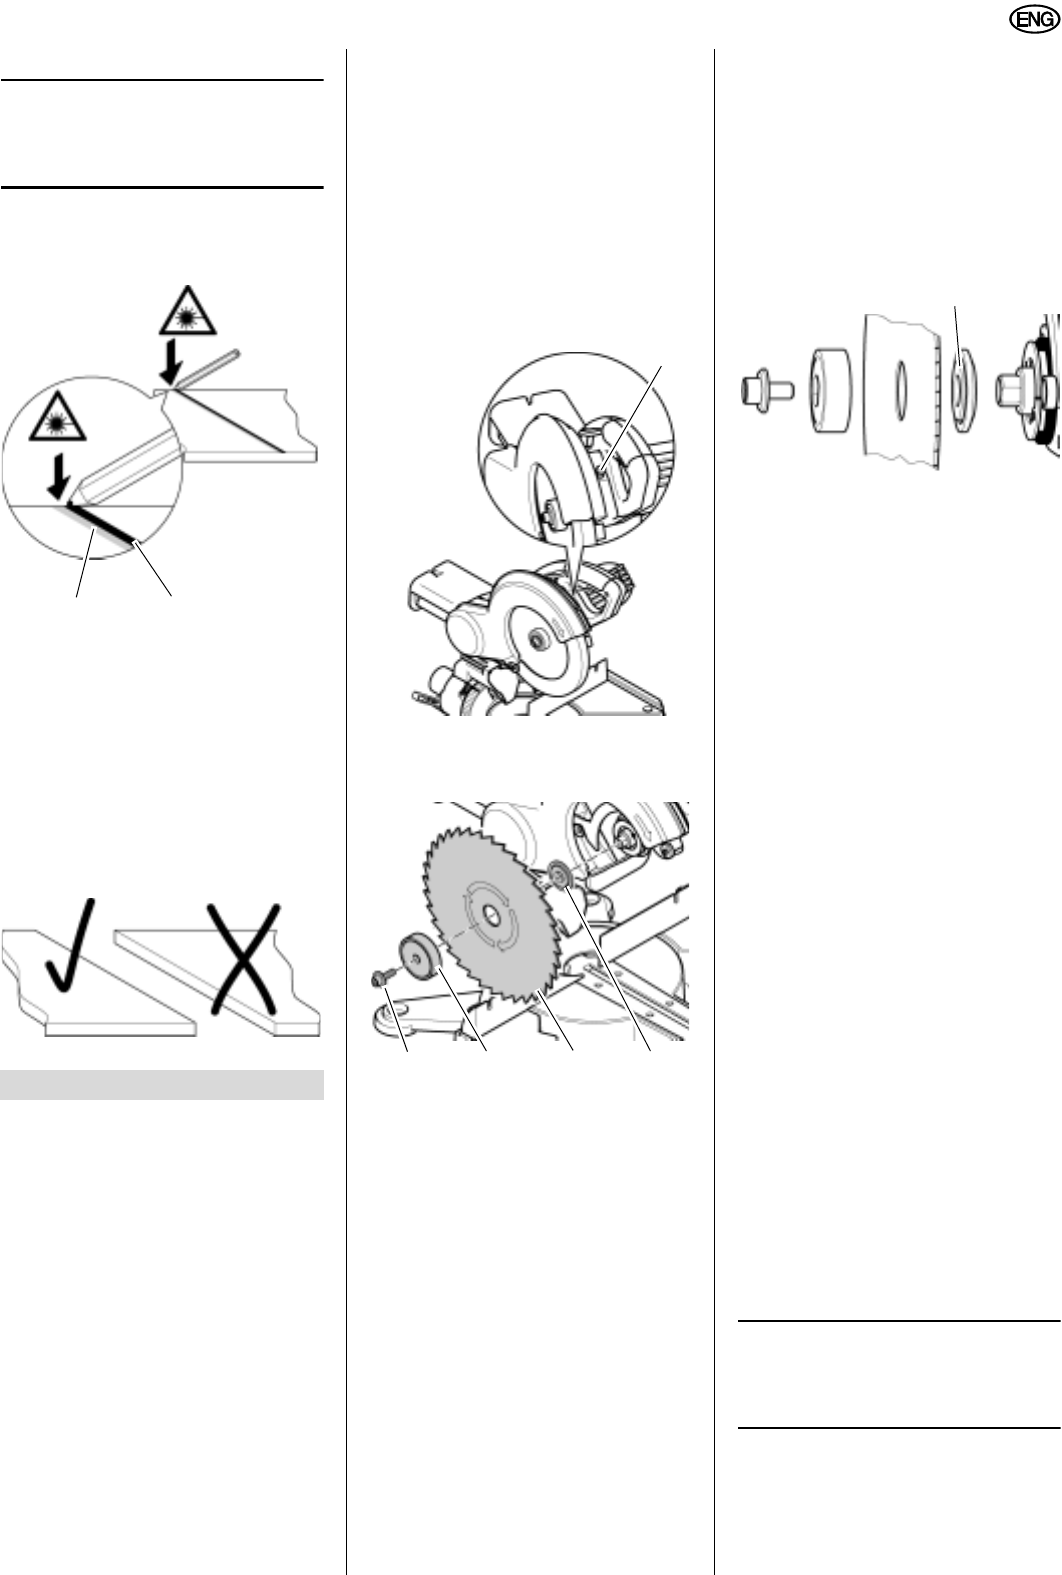
Aligning the marking
3
Note:
The guide line is slightly to the left of the
actual cutting line of the saw blade.
1. Align guide line (78) and your mark-
ing (79) with the saw blade fully
raised.
2. Do not move the workpiece, until the
cutting operation is completed.
3. Make several trial cuts in different
materials and thicknesses.
Once you are familar with the laser
guide's use, you can remove your mark-
ing from the workpiece's surface, cut it
away, or leave it on the workpiece. With
the help of the trial cuts, you can tell
which position is suitable for aligning the
guide line with your marking.
A
Danger!
Unplug before servicing.
− Repair and maintenance work other
than described in this section should
only be carried out by qualified spe-
cialists.
− Replace defective parts, especially
of safety devices, only with genuine
replacement parts. Parts not tested
and approved by the equipment
manufacturer can cause unforeseen
damage.
− Check that all safety devices are
operational again after each service.
9.1 Changing the Saw Blade
A
Danger!
Directly after cutting the saw
blade may be very hot – burning haz-
ard! Let a hot saw blade cool down.
Do not clean a hot saw blade with
inflammable liquids.
Risk of injury, even with the blade at
standstill. When loosening and tight-
ening the arbor bolt, the retractable
blade guard must encompass the saw
blade. Wear gloves when changing
blades.
1. To arrest the saw blade, press the
saw blade lock (80) down. At the
same time slowly turn the saw blade
by hand, until the saw blade lock
engages.
2. Remove the arbor bolt (81) from the
saw spindle (left-handed thread!).
3. Unlock the retractable blade guard
and open it.
4. Remove the following parts from the
saw spindle:
− arbor bolt (81),
− laser (82),
− saw blade (83),
− inner blade flange (84).
5. Clean clamping surfaces of:
− saw spindle,
− inner blade flange,
− saw blade,
− laser,
− arbor bolt.
A
Danger!
Do not use cleaning agents
(e.g. to remove resin residue) that
could corrode the light metal compo-
nents of the saw; the stability of the
saw would be adversely affected.
6. Put the inner blade flange (84) on
the saw spindle.
A
Danger!
Fit the inner blade flange cor-
rectly! Otherwise the saw may be
blocked, or the saw blade could work
loose! The inner blade flange is cor-
rectly positioned if the snap ring
groove (85) faces the saw blade and
its chamfered side faces the motor.
7. Mount the new saw blade (83) –
observe the rotational direction (the
arrows on both saw blade and blade
guard must point in the same direc-
tion)!
A
Danger!
Use only saw blades conform-
ing to standards and which are
designed for the maximum speed
(see "Technical Specifications") –
when using unsuitable or damaged
saw blades, parts might be hurled
away explosive-like by the centrifugal
force.
Do not use:
− saw blades made of high speed
steel (HSS);
− damaged saw blades;
− cut-off wheel blades.
A
Danger!
− Mount saw blade using only gen-
uine parts.
− Do not use loose-fitting reducing
rings; the saw blade could work
loose.
− Saw blades have to be mounted
in such way that they do not wob-
ble or run out of balance and can-
not work loose during operation.
8. Put the flange laser (82) on –
The metal side of the housing must
rest against the saw blade. The two
tappet flanges must engage on the
flats of the saw spindle.
3
Note:
Instead of the flange laser, the
outer blade flange supplied can be
installed.
9. Screw on the arbor bolt (81) (left-
handed thread!) and tighten with the
Allen key hand-tight.
To arrest the saw blade, use the
saw blade lock (80).
9. Care and Maintenance
78
79
80
81 82 8483
85


