


OM-533 Page 5
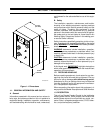
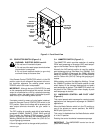
3-6. VOLTS/PEAK CONTROL AND PILOT LIGHT
(Figure 3-1)
This control presets weld voltage for constant voltage
applications and peak voltage for GMAW-P applica-
tions.
When
the Mode Selector switch is in the
CV position or
one of the pulses per second positions, the VOLTS/
PEAK pilot light turns on.
This
control is disabled
when the Mode Selector switch
is in the CC position.
Rotating the control clockwise increases voltage.
IMPORTANT:
The VOLTS/PEAK control can be ad-
justed while welding.
3-7. METERS (Figure 3-1)
The
voltmeter displays weld
voltage to the nearest tenth
of a volt while welding and preset voltage when unit is
idling.
When welding using the pulsed GMA
W process,
the meter displays peak voltage.
The ammeter displays weld amperage to the nearest
ampere
while welding and preset amperage
when unit is
idling.
When welding using the pulsed GMA
W process,
the meter displays background amperage.
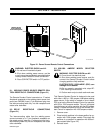
SECTION 4 – SEQUENCE OF OPERATION
WARNING: ELECTRIC SHOCK can kill;
MOVING PARTS can cause serious injury;
IMPROPER AIR FLOW AND EXPOSURE TO
ENVIRONMENT can damage internal parts.
•
Keep
all covers and panels in place while
op
-
erating.
Warranty is void if the welding power source is
operated
with any portion of the outer enclosure
removed.
ARC RAYS, SPARKS, AND HOT SURFACES
can
burn eyes
and skin; NOISE can damage
hearing.
•
Wear correct eye, ear, and body protection.
FUMES AND GASES can seriously harm
your health.
•
Use enough ventilation to keep fumes and
gases from the breathing zone.
WELDING WIRE can cause puncture
wounds.
•
Do
not point gun toward any part of the body
or other personnel.
HOT METAL, SPATTER, AND SLAG can
cause fire and burns.
•
Watch for fire.
•
Have a fire extinguisher nearby and know
how to use it.
MAGNETIC
FIELDS
FROM HIGH CURRENTS
can affect pacemaker operation.
•
Wearers should consult with their doctor be-
fore going near arc welding, gouging, or spot
welding operations.
See
Arc W
elding Safety Precautions Section in
the welding power source Owner’s Manual.
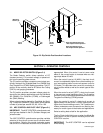
4-1. GAS METAL ARC WELDING - PULSED ARC
(GMAW-P)
WARNING:
Read and follow safety informa
-
tion at beginning of entire Section 4 before
proceeding.
1. Install
and prepare welding power source according
to its Owner’s Manual.
2. Install Remote Control as instructed in Section 2.
3. Install
and prepare wire feeder according to its Own
-
er’s Manual.
4. Wear dry insulating gloves and clothing, and wear
welding helmet with proper filter lens according to
ANSI Z49.1.
5. Prepare for welding as follows:
a. Connect work clamp to clean, bare metal at
workpiece.
b. Select and obtain proper welding wire, and
thread as instructed in wire feeder Owner’s
Manual.
6. Depress
welding power source POWER switch
ON
button.
7. Place Mode Selector switch to desired pulses per
second (60, 90, 120, or 180) position (see Section
3-1).
8. Place CONTACTOR switch in OFF position (see
Section 3-3).
9. Place
AMMETER switch in the desired position (see
Section 3-4).
10. Preset
AMPS/BKGD control to desired
background
amperage setting (see Section 3-5). Pilot light
should be on.